|
Language comprehension is fundamental to reading comprehension. Thus, it makes sense to help students build and strengthen it. The stronger a student’s language comprehension, the more deeply he or she will be able to understand written text. Here’s a classroom practices that builds and strengthens the components of language comprehension, specifically background knowledge, vocabulary knowledge, and topical knowledge. Use it prior to a introducing a theme, jumping into a unit of study, or tackling a story or chapter book. The Slide Show We all know the power of YouTube videos. In a matter of minutes, one clip can convey a lot of information. But my favorite activity for quickly communicating background and topical knowledge is a modern-day slide show. It imparts much more information than a video and is equally engaging. In the ancient days of my youth, slide shows were all about hardware. There were real slides (translucent film fitted inside a frame), a hard plastic carousel that stored them, and a slide projector that beamed light through the slides and onto a screen. Today’s slide shows, however, are software-based, made from digital images culled from the internet and pasted into a slideshow app. Unlike video clips, slide shows have no animation or narration, meaning you can create space for contemplation, letting students ponder a particular slide, asking questions about it, and soliciting comments. Set Up. To create a slide show, you need an app with a slide show function like PowerPoint or Keynote. You also need a way to get the images into the eyeballs of kids. This could be a projector and screen, a Smart Board, or even a laptop computer that, in non-COVID times, kids can huddle around. Finally, you need a strong sense of what you want to teach. Examples include a science unit on erosion, a reading genre like fairy-tales, or the setting for a story like One Crazy Summer (summer of 1968 in the city of Oakland, CA) or Owl Moon (the woods on a cold, winter night under a full moon). Once you have decided on your instructional focus, do a Google Image query and start sifting through pictures. Choose engaging pics that also tie into the words and concepts you want to touch upon in your upcoming story, theme, or unit. The trick is to pick information-rich photographs that both pique the interest of students and provide vocabulary and background knowledge. Next, import the pictures into your slide show app and make some brief notes (mental or written) about the information you want to impart as you show each picture. Now you’re ready to go. Modeling. It’s always a good idea to model the behaviors you want your students to exhibit. So, first model how to observe and notice. Using direct and explicit language, explain to students how to scan a picture. Then show them a photo and describe your observations, as well as defining select terms. vocabulary words. For example, this comment goes with the first slide in the figure below: “This boy is wearing a kimono. A Japanese kimono is a traditional kind of clothing. In Japan, people wear kimonos for special occasions.” 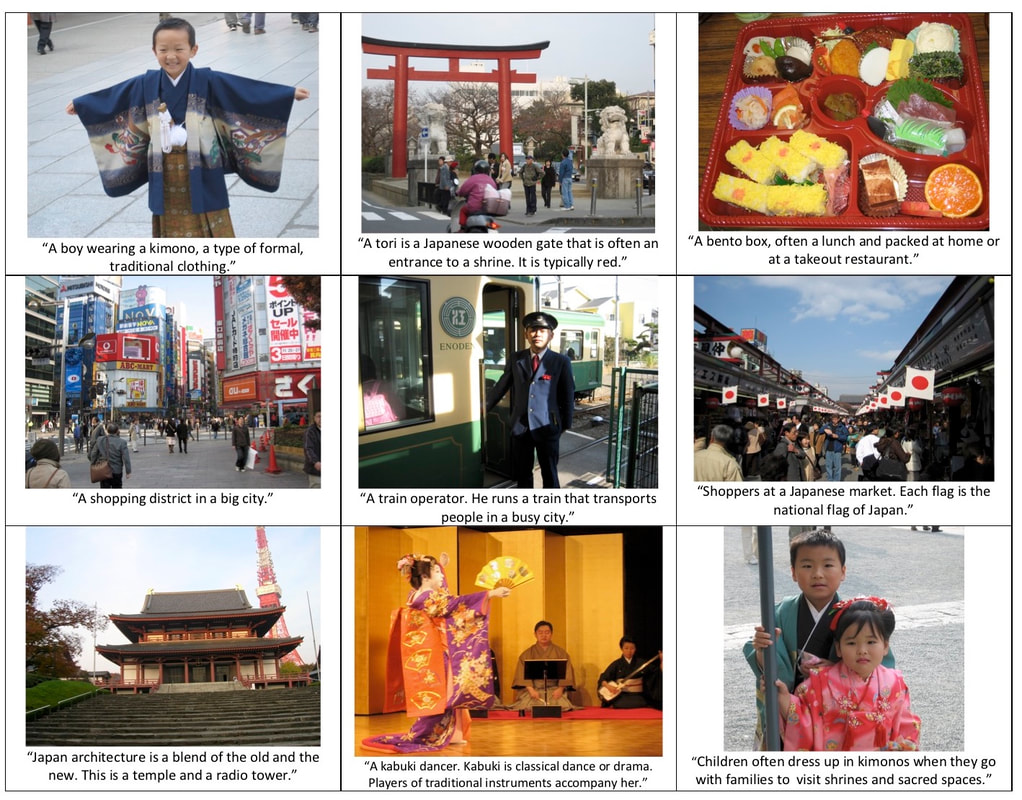 Build in appropriately sophisticated language whenever possible and intersperse the noticing with questions. “What do you notice in this picture?” and “What do you think this picture is showing us?”
The slide show below could be used to build knowledge prior to reading books that reference Japan, such as Wabi Sabi by Mark Reibstein or Grandfather’s Journey and Kamishibai Man by Japanese-American author and illustrator Allen Say. Under each photo, I’ve included examples of what I might say to students as I show each slide. These comments are not part of the slides; during a slide show, I don’t show text to students. No matter the content, the big picture goal is to orally building language comprehension through showing pictures and verbally giving information. Slide shows can be as long or as short as you want them to be. However, if you make them too short, they won’t give enough information, and if you make them too long, you’ll eat up too much time and your students may lose interest. Keep in mind the age and attention span of the children you teach. A show of twelve to twenty photos is a length to aim for, and total time for the activity is less than 15 minutes. When to use. I recommend showing a slide show prior to reading a historical novel or any book with a setting unfamiliar to many students. The ultimate goal is to add words and associated meaning to a child’s mental lexicon. Then, when it comes time to read, this knowledge is available to the reader. If a picture is worth a thousand words, then a slide show with a dozen or more pictures really adds up! Final tips. Some photos generate more discussion and/or questions than others. If you notice that one of your slides is not engaging students or fostering discussion, take note of it so you can replace it with another picture at a later time. Also, team up with two or three other teachers, map out and list slide shows that would be useful in your grade level, and then divvy up the job of finding pictures and creating shows. If everyone swaps slide shows, you can create and store 10 or 12 of them without too much effort. |
Mark WeaklandI am a teacher, literacy consultant, author, musician, nature lover, and life long learner.
|
 RSS Feed