|
I love statistics: they’re fun, fascinating, and shed light on the world around me. For example, an average day, American men still do much less housework than American women (19% to 49%). Over the last 50 years, the average size of the American home has nearly tripled in size, yet 1 out of every 10 Americans rent offsite storage and 25% of all people with a two-car garage don’t have room to park even one car inside it! Statistics also inform my teaching. For instance, over the last few months I’ve been mulling over the frequency of phoneme spellings. Consider this: the Long O sound is spelled much more frequently with an open syllable (as in go, hero, and open) than vowel-consonant-E (as in hope, stone, and invoke). Specifically, the Long O sound is spelled open syllable 73% of the time while O-consonant-E is used 14%. Is this an interesting but useless fact? Not at all. Knowing the frequency of phoneme spellings can help teachers more effectively teach spelling and phonics. Frequent phoneme spellings The most common spellings of the 44 English language phonemes were originally explored and cataloged in 1966. In a study still available through JSTOR (citation below), researchers considered 17,000 of the most frequently occurring words in English. Later, the now famous word researcher Edward Fry revised the research, putting the results into more clearly understood tables and answering this question: what are the most useful (highest frequency) phoneme-grapheme correspondences? I first learned of Fry’s most frequent phoneme spellings while doing research for my 2017 Stenhouse book, Super Spellers. Lately I’ve been using the information to help me construct the effective spelling-phonics scope and sequence that I’m using in two curriculum projects. Below this post is a table that “paraphrases” Fry’s summarization. I find it not only valuable but also often surprising. For example:
To statistic lovers, the phoneme spelling frequency table is interesting. But to teachers it is super valuable because it shows us the letter patterns most advantageous for primary grade reading and writing. Said another way, the chance of primary grade reading and spelling success increases when we de-emphasize or avoid the rare spellings that take up instructional time but are of little use to readers and writers at a less advanced level. For example, let’s consider those Long O spellings I mentioned earlier. Remember, 73% of words with the Long O sound are spelled with an Open Syllable O while 14% use O-consonant-E. How does this inform my instruction? When it comes time to teach the various vowel-consonant-E spellings, it means that, sure, I will focus on O-consonant-E. But I won’t focus on O-consonant-E for too long because I’ll want to quickly move to the important open syllable O spelling, which allows students to spell and read words such as no, go, also, silo, hero, zero, hello, bonus, focus, open, over, program, protect, rotate, locate, motion, lotion, radio, studioand many others! Here are some of the principal spellings in order of frequency, along with example words. Note: it is important to pay attention to the example words because the phonemes are not represented with the additional “sound markings” that Fry included. Also note that some spellings are so infrequent, such as /er/ sound spelled IR, that they are not included on the chart. For the complete chart, go to the "File Cabinet" tab of this website and download the PDF, which is the second file in the left hand column. 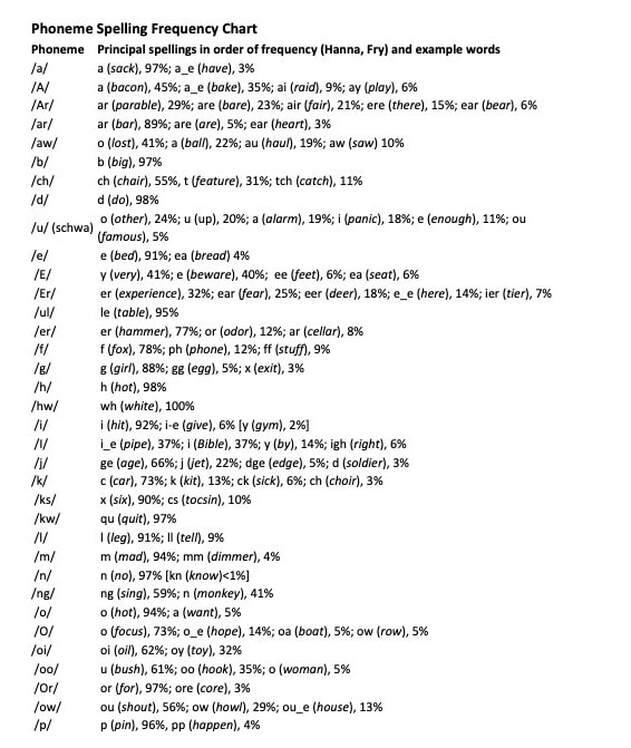 Summary Information on spelling frequencies allow us to identify and then focus on what is most important for foundational reading skills. The big idea is often times the most frequent sound spellings are the most useful for the early development of reading and writing skills. When we identify and focus on frequent spellings, our students have a greater chance of mastering spelling in general, which then helps them become more fluent readers. In my next post, I’ll consider what the frequency of sound spellings means in relationship to a couple of actual spelling scope and sequences: one used by the Jolly Phonics program (for emerging readers and writers) and the one I’m making for use in my curriculum projects. Sources
Sponics and morphabulary – ever heard of them? Microsoft Word certainly hasn’t. As I type the words on my laptop, they appear underlined in jaggedy red. Jaggedy is underlined, too! I love language and so it’s fun for me to create new words by playfully combining elements of spelling & phonics, morphology & vocabulary, and jagged & raggedy. Each of those six words, by the way, is an entry in your brain dictionary. As your eyes scan each word’s letter sequence, your brain recognizes that the sequence is a correct one. In other words, each word is spelled correctly. This recognition of a correct word spelling then triggers word meaning (definition) and sound (pronunciation). On the other hand, my three made up words – sponics, morphabulary, jaggedy – are not entries in your brain dictionary. That’s why when you first encountered them, you probably slowed down to ponder them. I’m using made-up words as an entry to these important points: 1) spelling is critical to the reading process, 2) it pays to teach spelling and phonics together, 3) it also pays to connect morphology and vocabulary, and 4) all manner of reading, writing, and spelling is dependent upon the orthographic processing system. Orthography and More Orthography is the conventional spelling system of a language. It can be thought of as the recordings of correct letter sequences. These sequences, stored in our brain’s neural circuitry as chunks and words, are used for spelling and reading. The two actions of spelling and reading, or encoding and decoding, inform and reinforce one another. Practicing spelling can help us become more fluent readers; conversely, engaging in lots of reading can help us remember the spelling of words. 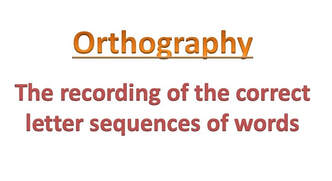 I like to use one term – orthography – when discussing instruction that teaches spelling-phonics because I want to drive home the idea that the two are best understood when presented together. Linnea Ehri famously pointed out that encoding and decoding (spelling and phonics) are “two sides of the same coin.” Vocabulary, which has to do with meaning and may involve the analysis of morphemes (word parts that have meaning), also has connections to encoding and decoding. Thus, I often think of instruction that promotes automatic word recognition in terms of one hyphenated concept: phonics-spelling-morphology-vocabulary. In more playful moments, it’s sponics and morphabulary. Either way, integrated instruction leads to synergy, an effect beyond what is contained in the individual parts. 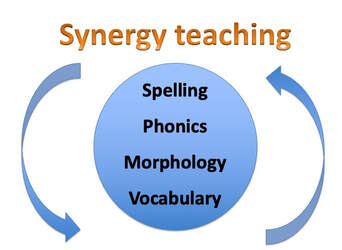 With its roots firmly in phonological awareness and its parts intertwined with language comprehension, phonics-spelling-morphology-vocabulary becomes much less than itself when disassembled into parts that are then taught in isolation. So it makes sense to engage in integrative instruction. Here are two routines that neatly combine spelling and phonics (orthography), as well as sound (phonology) and a bit of vocabulary and morphology (meaning). Hear It, Say It, Write It, Read It Based on the work of Dr. Richard Gentry, this routine is an alternative to a traditional spelling quiz. Start with ten words that contain the patterns you want to teach. For example, let’s say you want to teach ways of spelling the Long O and Long E sound and your lesson is on the positional spellings OA and EA. My routine, which starts with direct and explicit instruction and then moves to repeated guided and independent practice, activates meaning, sound, and spelling (the Eternal Triangle I love to talk about). The routine might sound something like this:
You’ll notice that the routine has the students say the word multiple times (phonology) and gives an opportunity for both spelling and then reading (orthography). Also, the routine does not present the word in a sentence, such as “When he found his wallet was missing, the man let out a load groan.” Rather, it directly and explicitly defines the meaning of the word: “Groan, a deep sound of sadness or pain.” Thus, meaning is directly and explicitly built, just like the spelling of the sound. In the Hear It, Say It, Write It, Read It routine, meaning is rooted in vocabulary. But we can also teach meaning through morphology, as in the word ladder routine below. A morpheme is the smallest unit of meaning in a word. Ant has one morpheme – the word itself, meaning a small, hard-working, colony-based insect. When we add a plural S to make ants, the word now has two morphemes, ant + s. Anthill also has two morphemes or meaning parts: ant + hill. If we add a plural S to make anthills, the word has three meaning parts. Word Ladder for Meaning, Sound, and Spelling This word ladder routine is an example of teaching meaning, sound, and spelling with a special emphasis on morphology. Like Hear It, Say It, Write It, Read It, this routine starts with direct and explicit instruction and then moves to repeated practice that activates meaning, sound, and spelling. Here’s an example of what the routine might sound like in a classroom.
* NOTE: Continue this routine to teach the ED ending. 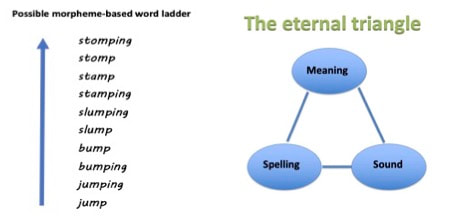 Summary
Both routines activate the Eternal Triangle: meaning, sound, and spelling. Both incorporate Linnea Ehri’s very important observation that decoding and encoding are “two sides of the same coin.” They use the effective instructional practices of direct and explicit instruction and repetition. And both create synergy by incorporating some vocabulary and morphology instruction. Sponics and morpabulary - no matter how you spell it, directly and explicitly teaching students the fundamentals of reading in a synergistic way is effective practice, the kind that helps to prevent reading difficulties from developing. When it comes to how reading arises, we know a lot. For example, we know that 1) reading arises from the interaction of specific brain processing areas (semantic, phonological, and orthographic), 2) the visual perception of correct letter sequences is the first thing to occur in the reading process, and 3) processing, strategy use, and opportunities to practice collectively work to build increasingly skillful reading. From this body of evidence flow many practical and effective classroom practices or actions, useful for teaching students in a variety of settings, able to prevent many reading problems, and valuable as teaching tools that help students overcome many reading difficulties. Previously, I outlined practices for preK to first grade. Here are thoughts on the broader K to 3rd grade band. Kindergarten through Third: Reading and Meaning Reading is ultimately about meaning. This is why we always help students connect the act of reading words to the act of comprehending words. But when students don't automatically recognize words they encounter, their levels of comprehension drop. And so we help students vigorously build and then skillfully combine both streams of the reading river: language comprehension and automatic word recognition. Let’s tackle the last one first. 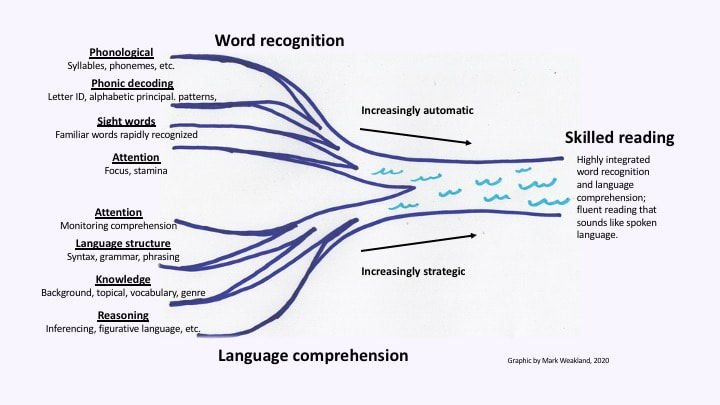 Helping young readers develop phonological and orthographic skills is critical. To break the code and become automatic word recognizers, some children need a great deal of direct, explicit, and systematic phonics and spelling instruction, coupled with instruction that lifts them to phonemic proficiency. This is especially true for students who have or may have dyslexia. The skills students need to become automatic word recognizers include:
Activities and materials that can be used to teach phonological and orthographic skills to mastery include:
 Helping young readers develop language comprehension skills is critical. To become strategic readers who actively reflect, problem solve, use strategies, and ultimately read with deep meaning, all students need to develop the skills listed below, and some will need a great deal of direct and explicit instruction with repeated practice to reach mastery levels.
Activities and materials that can be used to teach language comprehension include:
 Of the actions I’ve pointed out in this blog, most are presented in detail in my 2021 Corwin book How to Prevent Reading Difficulties. Also, if you visit my YouTube channel, you can see me model some of the teaching practices or actions I mentioned, including Look-Touch-Say, flip folders, word ladders, and sky writing.
Wishing you successful weeks of teaching and a relaxing and happy holiday break! I have been presenting seminars on dyslexia for more than two years now, but the question “What is dyslexia?” still worries my mind. I want to make sure I'm getting it right! Some researchers, like Julian Elliot and Athansios Protopapas, say this: dyslexia is simply the far end of the reading achievement bell curve. They believe this lack of reading achievement is not neurobiological in nature (because evidence doesn’t support this conclusion), and labeling students as dyslexic is generally unhelpful, if not downright harmful. Meanwhile, professors like Andrew Johnson claim dyslexia is best understood as an ineffective use of meaning-making strategies (an idea also put forth by Constance Weaver) and disparage programs like Orton-Gillingham, saying they are unproven, overpriced, and ineffective. Statements such as these, however, are in the minority. Many more experts say this: dyslexia is a collection of traits, neurobiological in origin and arising from genetics, that lead to differences in the performance of reading-brain circuitry. In turn, these differences make it especially difficult for some people to learn how to read and spell and result in life-long challenges (of varying degree) in reading and spelling. Here is something else many experts say: direct, explicit, and systematic instruction - grounded in phonics, phonology, and fluency and focused on mastery learning - is effective in both preventing and overcoming many types of reading difficulties.  For me, this stance sits on solid ground and reflects what I see and hear in the world of teaching.. Based on theories of reading built upon large bodies of evidence, the stance is anchored in the research of Bruce McCandliss, David Kilpatrick, Stanislas Dehaene, Gene Oulette, David Share, Mark Seidenberg, Mary Ann Wolf, and Linnea Ehri, to mention just a few. Importantly, this body of evidence points to these facts: 1) reading arises from the interaction of key brain processing areas (semantic, phonological, and orthographic), 2) the visual perception of correct letter sequences is the first thing to occur in the reading process, and 3) processing, strategy use, and opportunities to practice reading and writing collectively work to build increasingly skillful reading. Not only is this theory of reading (and the related theory of what dyslexia is and why it persists over time) backed up by evidence, it leads to many practical and effective classroom actions that can be used to teach the students who struggle the most, regardless of whether or not they are identified as having dyslexia or a specific learning disability. When these classroom actions are put in place, they prevent many reading difficulties from occurring. Not only that, if difficulties do occur, these actions help students to overcome their difficulties. Finally, when I travel around the country and ask teachers if programs like Heggerty Phonemic Awareness, Read Naturally, and Lindamood-Bell’s LiPPS are helping to move struggling readers and spellers forward, their answer is resounding YES! This is why I present dyslexia as being a learning difference that is neurobiological in nature and responsive to Tier I, II, and III instructional practices that stresses phonology, orthography, and fluency. What are some of these specific instructional practices? In the rest of this post, as well as a following one, I will give a variety, starting with PreK to First Grade. Here we go… PreK to First Grade For young students, one of the most important things you can do is teach phonological awareness to an advanced level. Aggressively teaching phonological awareness to an advanced level can help prevent reading difficulties from occurring, as well as help students overcome challenges if they do manifest. A sequence of necessary phonological skills includes the following:
Phonological skills, from identifying and manipulating syllables and rimes to phoneme segmentation and manipulation, can be taught through a variety of activities and materials, including:
 Assessments that give information on whether or not students have or are developing advanced phonology skills include:
 In next week’s post, I’ll continue the above list of classroom actions, giving you activities for orthography (phonics-spelling) and fluency, kindergarten through 3rd grade. In the meantime, thank you, teachers, for the work that you do! Select Sources
Reading fluency enables readers to gain a large amount of meaning from a large amount of text in a short amount of time. How can we help developing readers build their fluency? To answer this question, let’s begin with a definition.
What is Fluency? Fluency is made up of rate, accuracy, and prosody. When students exhibit appropriate amounts of all three, we can say they are fluently reading. Here’s another way to say it: Fluency is reading the words of any text accurately, at a reasonable pace, and with expression and phrasing that sounds like talking. Accuracy is easy to define and quantify - a student reads each word correctly or not. Likewise for rate - it is words read correctly per minute. But in any given text, how many words per minute should a student read? And is there a degree of accuracy all students must achieve? As we’ll see, these questions are trickier to answer. Last but not least is prosody, sometimes defined as “reading with feeling.” When I listen to students read, I’m listening for appropriate intonation, stress, and phrasing. Prosody is intimately tied to rate and accuracy; it begins when students reach a decent rate of word reading and a high degree of accuracy. But prosody has an even greater chance of blossoming when students also have background knowledge, vocabulary knowledge, and a familiarity with genre and text structure. Thus, knowledge built from reading volume and breadth can in turn build prosody. How Can We Think About Rate Scores? There’s no doubt reading rate is important. Like airplanes rolling down runways, readers must hit some minimum speed to take flight. And once airborne, they must achieve a decent average speed to cross the landscape. In other words, readers must read a certain amount of text in a suitable amount of time. But are there exact numbers that all students must definitely achieve? Not really. First, benchmark scores vary by assessment. For example, Acadience Learning (formally DIBELS) wants springtime 2ndgraders to read 87 correct words per minute. Meanwhile, AIMSweb wants them to read 92 and Scholastic 94. As for fluency norms, when Hasbrouk and Tindal updated their oral reading fluency norms in 2017, they found that springtime 2nd graders falling in the center percentiles (25th to 75th) read between 72 and 124 words per minute. That’s a pretty wide range. Of course, we don’t want students to read too slowly. But we also know some children are “slow and steady” readers with good to great comprehension. Finally, and I think interestingly, Hasbrouk and Tindal found that with one small exception all of the 2017 oral reading fluency norms were higher than the 2006 ones. What does this say about our reading instruction? And what does it say about the nature of fluency itself? How Can We Think About Accuracy Scores? Regarding accuracy, it’s important that we give it great attention in our teaching, especially when working with struggling readers. We want to teach developing readers to read through every word, master phonic patterns, and apply decoding strategies and rules as a first line of attack. I’ve learned from researchers like Sally Shaywitz, Louisa Moats, and Timothy Shanahan, and from organizations like the Iowa Reading Research Center, that it is important to build accuracy first, as well as not lose sight of expression and phrasing. As the IRCC puts it, “Reading quality rather than reading speed.” Even as we pay great attention to accuracy, we don’t want to let “the perfect be the enemy of the good.” I recently talked to a reading interventionist who was teaching a 4th grader with dyslexia. After direct and explicit strategy instruction and lots of decoding practice, the student had greatly increased his reading accuracy and self-correction of larger words, in turn deepening his text comprehension and coming to enjoy the act of reading more. But with small words (was, use, then), he was still inaccurate. This didn’t greatly interfere with his ability to make meaning (his teacher deemed it satisfactory to excellent) but it did chronically keep his accuracy score at 97%, just below the 98% needed to move to the upper reading levels. Because the very act of “moving up” is motivating, the teacher said she wanted to bump her student to the next level, even though he consistently failed to make the cut score. I agreed with the teachers thought. And when I did some research, I found the creator of the leveled reading program was right there with us. Here’s a quote from Gay Su Pinnell: “Rather than setting a rigid criterion for moving a student ‘up’ a level, use informed teacher decision making.” When I touched base with the teacher two months later, she reported her student was doing “just great” in the upper level. In summary, pay close attention to accuracy and rate numbers but temper their power with your intimate knowledge of the reader who sits before you. Yes, teaching reading is a science but it is also an art! How Can We Help Students Strengthen All Components of Fluency? If you’re looking for effective and practical practices to increase all components of fluency, a great starting point is repeated reading. It comes in many forms, all initially guided by the teacher. All of the following activities are described in my previous blog posts and some are described in my recent Corwin Connect posting.
SOURCES
… whether or not we knew them we are saying thank you… - W. S. Merwin I’m a regular reader of poetry. Sometimes I’ll read online at the Poetry Foundation site or my friend Gloria will email me a poem. But most often I read from one of my collections. I enjoy holding a book in my hand, reading and re-reading a poem while curled in a comfy chair next to the pellet stove (winter) or in the shade of a big oak (spring, summer, and fall). Some of my favorites are found in collections written by Mary Oliver, Billy Collins, Gary Snyder, and Maya Angelou or collected in anthologies, where I contemplate the words of Rilke and Rumi. The poet I’m loving right now is W.S. Merwin, whose unpunctuated, uncapitalized lines can be read in any number of ways. Amazingly, each version is a surprise and revelation. If you’re interested, I’d suggest Thanks, a beautiful entry point to his poetry. Poems can play an important part of early reading instruction because they lend themselves to practicing a wide variety of literacy elements, including vocabulary, speaking and listening, genre and author study, phonic-spelling patterns, and comprehension through close reading. Additionally, they can be used for shared reading, small group reading, and independent reading. Finally, most children find poems engaging and enjoy reading them. I attribute this to their brevity, rhythm and rhyme, and ability to evoke a wide variety of feelings and wonderment.  One of the great things about poems is that you can easily use them to help students build fluency, especially the components of accuracy and expression. It’s all done through repeated reading. Here’s on possibility for instruction that combines language comprehension and word recognition. First, find three poems of varying levels. Then consider this three-day routine, which you can unfold over two weeks. It contains a good deal of repeated reading, as well as teaches vocabulary, comprehension, and speaking and listening. Three-day Routine First Day (15 -20 minutes)
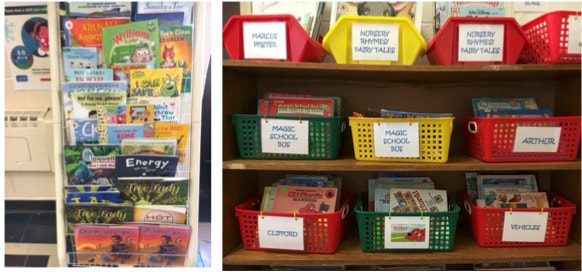
Personal Poetry Anthologies Personal poetry anthologies grow and expand as the months goes by, reflecting a child’s reading preferences. Each poem in the anthology provides an opportunity for students to engage in re-reading, build their fluency, and share their reading with others. Regardless of whether or not you use the 3-day routine, put a previously read poem into a binder or folder with the students name on it. I give students the option to take a second or even third poem, each typically at a different level of difficulty. Thus, after two months, some children will have a dozen poems in their anthology while others may have only four or five. If your budget and/or storage space is limited, store poems in a two-pocket folder with or without fasteners. If you don’t use fasteners, I suggest gradually stapling the poems into packets of six to eight (so papers don’t go flying if the poems fall out). 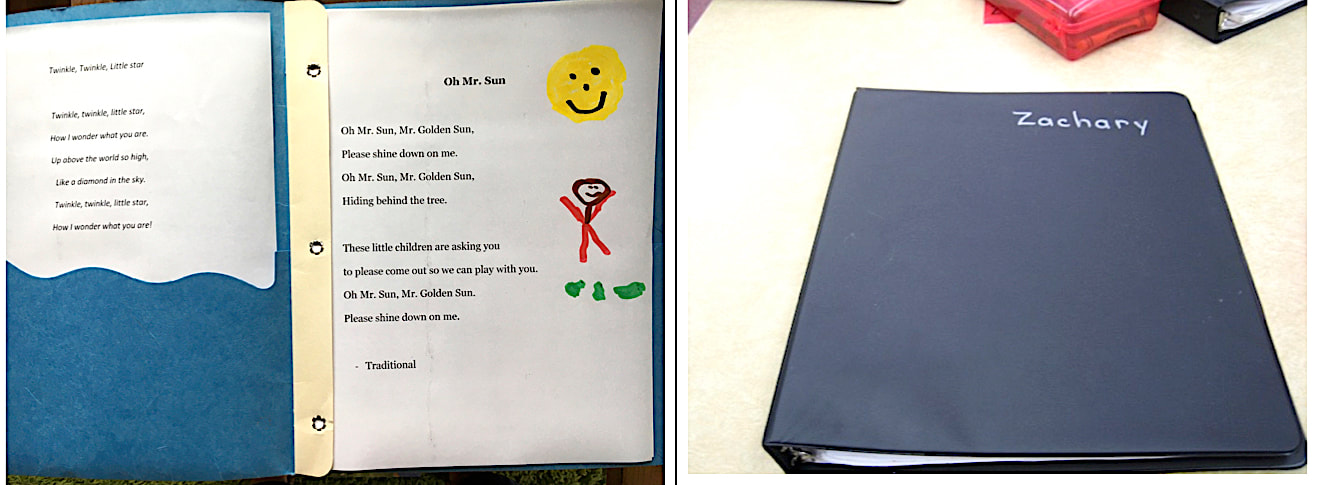 Photos: Two examples of poetry anthologies Here’s a list for students giving options for poetry anthologies: During independent reading time, you can read…
Teaching Tip Fluent reading unfolds smoothly, with expression and in broad brushstrokes of phrasing. To drive the point home, put out a container filled with small paintbrushes. Then allow your students to take a paintbrush and re-read a poem or passage by pulling the brush smoothly below the sentences It’s a kinesthetic trick that keeps kids engaged as they re-read. Encourage the reading of phrases, smoothly, in broad strokes. Read like a painter, not…like…a…pointer! 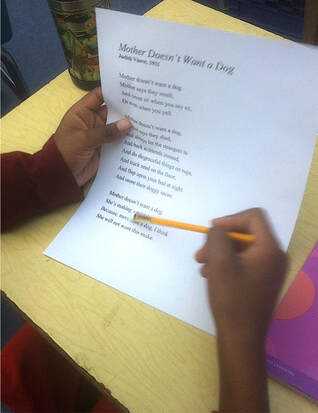 Repeated Reading, pioneered by Dr. Jay Samuels, is a specific and thus capitalized routine for building fluency. But when it comes to uncapitalized types of repeated reading, there are many engaging ways to go. This post looks specifically at choral and echo reading. Both provide support for reluctant or struggling readers, allow the teacher to monitor word pronunciations and note errors, and provide valuable feedback, important because feedback helps readers form the exact pronunciation and spelling of every word. With repeated reading, words can be more fully processed by the brain’s reading circuitry and thus there is a better chance that each word will be stored completely (with all aspects of meaning, sound, and spelling) in the “brain dictionary.” Choral and Echo Reading During choral reading, students read a short piece of text in unison with the teacher. After the teacher first models fluent reading, students read along and try to match the pace and prosody. The text can range from lines of decodable text or sentences from a leveled reader to a paragraph from an article, a story excerpt, or a book. Another option is a piece of poetry. Depending on the poem and the students, either the entire poem or a specific stanza is repeatedly read. Echo reading is when the teacher models and then the student or students read the same text back. Kindergarten kids typically echo one sentence. To determine the number of sentences for other grades, consider the demands of the text and the abilities of the students. If students need support and the sentences are relatively difficult (longer and/or with higher decoding demands), one sentence will do. But if sentences are shorter and easier to decode, pick two or three for echoing. Otherwise, students with good short term memory will simply “parrot back” a sentence without ever reading it. 
Groupings for Choral and Echo Reading Echo and choral reading can be used with groups of all sizes, from small to whole. When working with students who need a lot of support, use both types of repeated reading every day. Here’s one possibility for what a repeated reading routine might look like:
A Classroom Example As an example of repeated reading, let's imagine a small reading group of five 3rd grade students who have just finished whisper reading the text at the bottom of this post. Your teacher talk might sound like this:
Upcoming In my final blog on repeated reading (coming up in two weeks), we’ll dive into why and how to use poetry for repeated reading. Throughout my educational career - from special education teacher to reading interventionist to classroom co-teacher – I loved the point in the year when young readers “took off.” Seemingly out of the blue, they suddenly became much more fluent readers. When students entered this stage of their reading development, their rate and accuracy increased dramatically and they were able to confidently and quickly traverse whole paragraphs, even when the written terrain became difficult. For decades reading research has shown us that reading fluency - the ability to read accurately, at an appropriate rate, and with proper expression and phrasing - is essential to reading comprehension (LaBerge & Samuels, 1974; Stevens, Walker, & Vaughn, 2017). One especially effective and efficient practice that builds students’ reading fluency is guided repeated reading. The activity provides less skilled readers with the opportunity to hear a model of fluent reading and then practice the same passage in a way that minimizes errors. Additionally, reading aloud with others (often with the teacher) builds confidence, lessens the stress of reading independently and supports any student who feels shy or nervous about reading out loud. Capitalized Repeated Reading Repeated Reading is the specific (and thus capitalized) routine pioneered by researcher Jay Samuels. It has been shown to be effective at improving the oral reading fluency of elementary students, including those with learning disabilities (Kim, Bryant, Bryant, & Park, 2017; Stevens et al., 2017; Lee & Yoon, 2017). The routine shares these key ingredients with other varieties of repeated reading (such as echo reading, choral reading and Radio Reading):
Through its very nature, Samuel’s routine gives students lots of reading practice. It goes, however, above and beyond garden varieties of repeated reading. According to Timothy Shanahan, “Repeated Reading is a particular method … to develop decoding automaticity with struggling readers. In this approach, students are asked to read aloud short text passages (50-200 words) until they reach a criterion level of success - particular speed and accuracy goals” (Shanahan, 2020). Said another way, the routine uses goal setting, instant error correction, and peer mediation to boost all components of reading fluency. 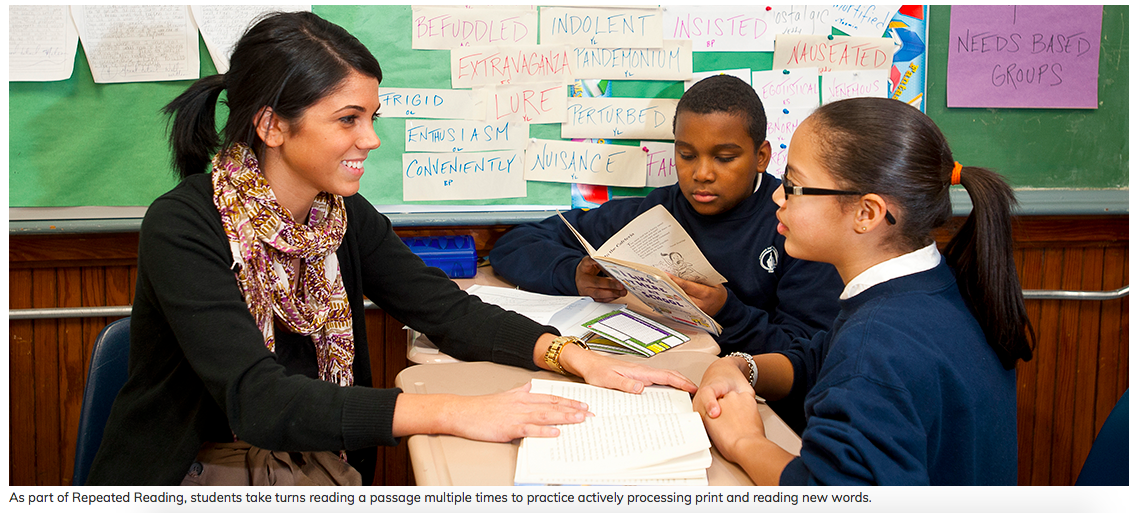 Photo from IRRC's website article on Repeated Reading (courtesy Merrimack College School of Education/Flickr)
Putting Repeated Reading to Use Repeated reading of all types typically leads to improved reading performance, especially for low performing readers (Zawoyski, et. al., 2014), with the biggest payoffs being more accurate word reading, improved oral reading fluency, and more reading comprehension (Shanahan, 2020). Still, some schools and teachers don’t make use of this powerful practice. Here’s what dyslexia researcher Sally Shaywitz has to say: “…the proven effectiveness of guided repeated oral reading to increase fluency is too often ignored. That is unacceptable. In fact, the evidence is so strong that I urge adoption of these programs as an integral part of every school reading curriculum throughout primary school” (Shaywitz, p. 233). Fortunately, it doesn’t take much time and effort to understand and then adopt the practice in your reading block. If you would like to understand Samuel’s Repeated Reading routine well enough to use it with your readers who struggle, here are three resources to explore - just follow the links:
The work of S. Jay Samuels has had a profound impact on the field of reading instruction. Dr. Samuels passed away last year in December. Whether they know it or not, teachers who engage in quality reading instruction have been influenced by Dr. Samuels and countless children have become better readers because of his insights. If you’d like to read about S. Jay Samuel’s life and reflect on his accomplishments, follow this link and read the “in memorium.” Citations and Sources
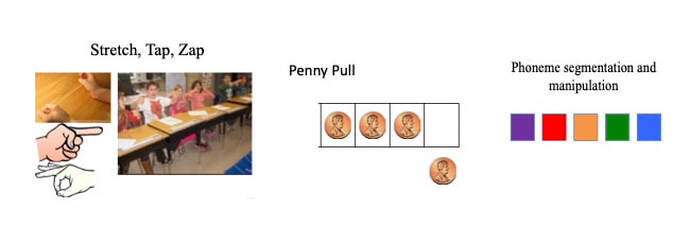
The interaction of meaning, sound, and spelling is what gives rise to foundational to reading. From researchers and writers such as Linnea Ehri, Mark Seidenberg, David Share, Gene Ouellette, and Louisa Moats, we know that becoming aware of the individual sounds in words (phonemes) is critical to the development of orthographic mapping –the brain process of associating letters with sounds that ultimately leads to the automatic recognition of a word’s spelling, meaning, and pronunciation. Without well-developed orthographic mapping, children (and adults) will struggle to develop fluent reading and writing. So, how do we best set our young students on the path of phonemic awareness ? In his excellent 2015 Reading Teacher article on early literacy research, D. Ray Reutzel identified phonemic segmentation as an activity that gives a lot of bang for buck. To be clear, he still encouraged the teaching of onset-rime, rhyming, and alliteration. But he did emphasize segmenting, a somewhat advanced phonemic skill. So, let’s look at ways to teach the discrimination, segmentation, and blending of phonemes, thus moving students towards the ultimate goal of advanced phonemic awareness. Stretch the Word When we speak, their individual sounds of words are blended together (co-articulated), making it difficult to hear where one sound begins and the other ends. Plus, oral language goes by very quickly. To help students hear sounds within words, teach them to slow down the speaking of word so they can hear the phonemes within each one. Later they can segment those phonemes more discretely through activities like Tapping and Zapping (more on this in a minute). To stretch a word, tell your students to pretend the word is a big rubber band. If you live in western Pennsylvania, ask them to imagine a “gum band.” They’ll know what you mean. Grab hold of either end of the word (make two fists and hold them close to each other in front of you). Then slowly pull your hands away from each other, stretching the word out, holding out the vocalization of each phoneme as you stretch. After the rubber band is stretched as far as it can go and all of the phonemes have been drawn out, snap the band back together with a handclap. When students clap, they say the word. In this way, phonemes are blended back together to make a word. Words with continuant sounds in the beginning are best for beginners so choose your words carefully. For example, flip is a good word to start with. It’s stretching and blending would sound like this: ffff-llll-iiii-p, (clap) flip! To build vocabulary, go beyond common words. For example, when having students phonemically segment closed syllable words, use vast as well as big and dash as well as run. Quickly and effectively define these words for children through direct and explicit instruction. Tapping and Zapping: Using fingers to segment sounds Stretching a word helps students hear the individual sounds within words. Tapping and Zapping take the ability to the next level – isolating or segmenting those sounds. Tapping involves extending your non-dominant arm and then using three fingers on your dominant hand to tap out the individual sounds of a word along your arm, starting up near your shoulder and working towards your wrist. Fish would get three taps (/f/, /i/, /sh/) and flip would get four (/f/, /l/, /i/, /p/). Once the tapping is done, go back to the shoulder and slide your hand down your arm, shoulder to wrist, blending the sounds back together as you say the word. To model zapping, say the target word as you make a fist. Next, segment the word into the sounds you hear, pumping your hand and throwing out a finger for each sound you say. For example, the word it gets two pumps. The index finger comes out when you say /i/. The middle finger comes out when you say /t/. Finally, draw your fingers back into a fist, blending the sounds together, and saying the word. When giving words, it is important for you to say the word and have your students repeat it with you (I Say, We Say) before the zapping begins. I Say, We Say gives a model of the correct pronunciation of the word prior to sound segmentation and an opportunity to repeat that correct pronunciation. After all, one cannot segment phonemes correctly if the word isn’t pronounced correctly. Hear It, Say It, Zap It, Blend It Here’s a teaching routine I still run in classrooms. If I use six or seven words, it takes about five minutes. In this routine, keep your instruction direct and explicit, use modeling, and proceed at a brisk pace. The point is to work in lots of practice so the kids can master the technique. Once mastered, children can use zapping as an independent strategy for spelling and reading many unknown monosyllabic words. In this lesson, we’ll imagine the teacher is working with a group of second graders on the r-controlled syllable.
Stretch It, Tap It, Zap It With short bursts of repeated practice distributed over time, students can master the art of stretching, tapping, and zapping in just a few weeks. Combine all three – stretching, tapping, zapping - into short routine. Click this link to see me demonstrating Stretch It, Tap It, Zap It. And the pics below show a friend, who appears in my recent book, doing the same. 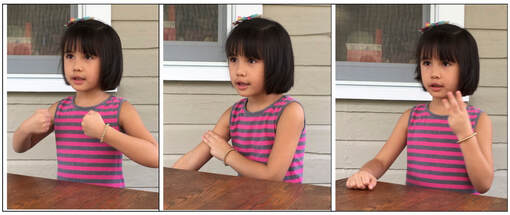 In an upcoming post, developing advanced phonemic awareness While segmenting and blending are necessary skills, they are only somewhat advanced. To increase the chances students will develop strong orthographic mapping, we want to move students farther down the phonological bookshelf to truly advanced phonemic skills: subtracting adding, and moving phonemes to make new spoken words from old ones. In an upcoming blog, I’ll give activities that develop the most advanced phonemic skills. Sources / Citations
 By the Way
The activities described in this blog (as well as many others) can be found in my new book from Corwin! Spoken language has sound, from the strings of utterances that we call sentences to the discrete, specific sounds (phonemes) that make up every word. It’s vital that young students become aware of the sounds of language and skillful in their analysis and manipulation, and so today’s post looks at phonology – the study (and teaching) of language sounds. Phonology and phonological awareness To begin, let’s be clear on terms. Phonological and phonemic are not synonymous. Rather, phonological is the more encompassing term. Think of it as a big bookshelf labeled “the general awareness of the sound structures of speech.” This bookshelf is divided into sections that include, moving from the largest sound units of speech to the smallest, whole words (sunset), syllables (sun and set), onsets and rimes (s-un and s-et), and phonemes (s-u-n-s-e-t). Students who are phonologically aware can hear and count the number of words in a spoken sentence, as well as the number of syllables in a word. They can also produce rhymes and alliterations, such as Henny Penny and Peter Piper, as well as segment words into their onsets and rimes, such as P-eter and P-iper. Phonemic awareness Phonemic awareness is a subset of phonological awareness; it occupies a small but very important space on the big bookshelf. Students with advanced phonological awareness are phonemically aware. This means they not only understands that words are an amalgamation of discrete sounds, but they can also hear individual sounds within any given word, segment these sounds from a whole word, blend them together to create a spoken word, and even create a new word by manipulating, subtracting, or adding sounds. Some languages are made up of over 100 discrete phonemes. Others, like Hawaiian, have fewer than 15. The English language has 44. To discriminate between these sounds, produce them, and manipulate them, a student doesn’t need to see anything at all and so phonological and phonemic activities can be done in in the dark. In a purely phonological activity, no text is involved. But skillful teaching is! Activities that move students down the bookshelf There are many activities for teaching phonology, from the word level to the discrete sound level (phonemes). To move students along the shelf, let’s start with two that draw attention to the macro levels of spoken language: understanding that sentences contain words and understanding words have syllables. In the next biweekly post, we’ll move to the micro level: words are made of discrete sounds called phonemes. Word level: Hoppy Kangaroo Hoppy Kangaroo helps students in preK and early kindergarten hear and count the number of words in a sentence. Hoppy jumps each time a word is said. If a sentence has four words – The cake is tasty – Hoppy jumps four times. Notice we are not talking about syllables (tasty has two). Rather, the emphasis is on recognizing words, the largest blobs of sounds in language. If you happen to have a kangaroo hand puppet, great. But my Hoppy is a simple piece of clip-art, colored and attached to a ruler. Student kangaroos are the same art, scaled smaller and taped to popsicle sticks. 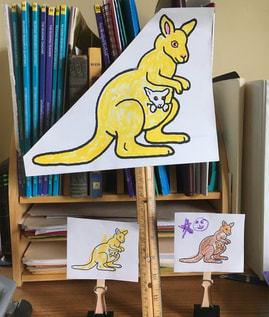 To teach, directly and explicitly tell students that sentences are made of words. Then introduce Hoppy however you like. Say Hoppy only jumps when whole words are spoken. Next, say a sentence, such as “I like grapes.” I think it’s best to start with sentences that have only single-syllable words. Have students say the sentence with you and maybe even on their own (I Say, We Say, You Say). As you hold Hoppy, repeat the sentence once more and this time make her hop each time a word is said: “I (hop) like (hop) grapes.” Finally, repeat the sentence once more and have your students count the number of time Hoppy hops. Click here to see a vid of Hoppy in action. Take the activity to a more advanced level by saying sentences with more words, first four and then five. Bring in some two-syllable words but remember: Hoppy hops on words, not syllables. For preschool and early kindergarten children, six to seven words might be a lot to count but see how far you can go. An even more advanced form of Hoppy Kangaroo is to put him out to pasture. Tell the kids that Hoppy is away, perhaps having breakfast at the IHOP (know you’re acronyms!). Then say a sentence at a slow to medium tempo and allow students to count the words without the kangaroo. To connect this activity to text without having to use spelled out words, use the Magic Line. I'll give more on the Magic Line in an upcoming post. Syllable level: Hands Together, Apart, and Away Advanced phonemic skills include adding, subtracting, and substituting phonemes to make new words out of existing words. Set the stage for this skill by teaching children to add and subtract the larger sound chunks of syllables. Deleting one word of a compound word eases them into this concept; replacing the deleted word with a different word, thus forming a new compound word, takes the skill to the next level. To help children better understand how deletions and additions work, use the hands together, apart, and away activity. To model this multi-sensory activity, turn your back to your students and present the back of your hands to preserve “reading left to right.” With your hands together, thumb touching thumb, say, “Daylight.” Pull your hands apart and say the compound words as separate words: “Day, light.” Next, put your hands back together and say, “Daylight.” Then, ask your students to say daylight without day. Model taking away your left hand and gently shaking your right. If they don’t know the remaining word, say, “Light.” Next, as your students to say daylight without light, taking away your right hand and gently shaking your left. If they don’t know the word, say, “Day.” The pictures from my recently published book show a first grader doing the activity. Click this link to see a video of me demonstrating Hands Together, Apart and Away.  As with Hoppy Kangaroo, a more advanced form of Hands Together, Apart, and Away is to do the activity without using hands! Once kids can accomplish this with a 2-syllable compound word, go to three syllable words. At this point, unless you are an octopus, you simply cannot use your hands to segment syllables. Have students say a three-syllable word like December. Then ask them to say the word with a syllable deleted. For example, “Say December without the De.” (Cember) Or say, “Say December without the last syllable.” (Decem).” Or ask them, “What is the first syllable? What is the last syllable?”
In two weeks, phonemes! In my next blog I’ll describe Stretch, Tap, and Zap, which move children farther down the bookshelf by teaching them to hear and then segment the phonemes that make up words. BTW The activities described in this blog (as well as many others) can be found in my new book, How To Prevent Reading Difficulties, PreK-3: Proactive Practices for Teaching Young Children to Read. Click these links to the preview the book at Corwin or Amazon. |
Mark WeaklandI am a teacher, literacy consultant, author, musician, nature lover, and life long learner.
|
 RSS Feed