|
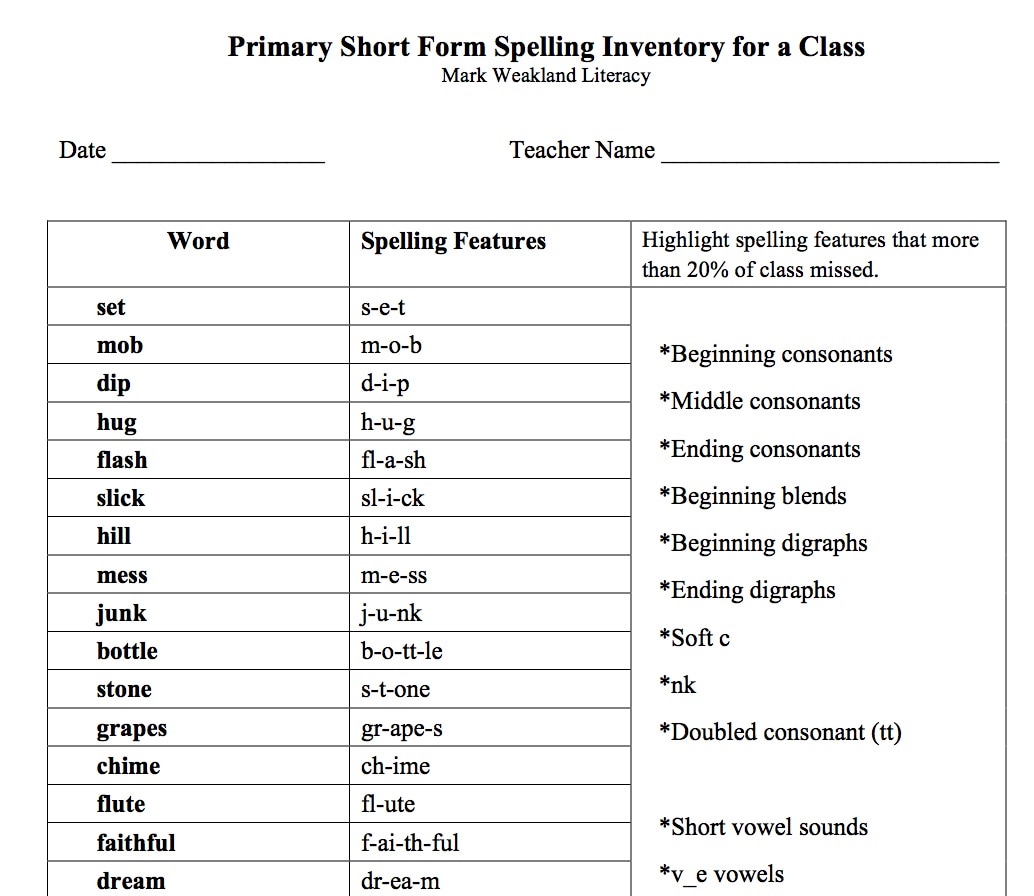
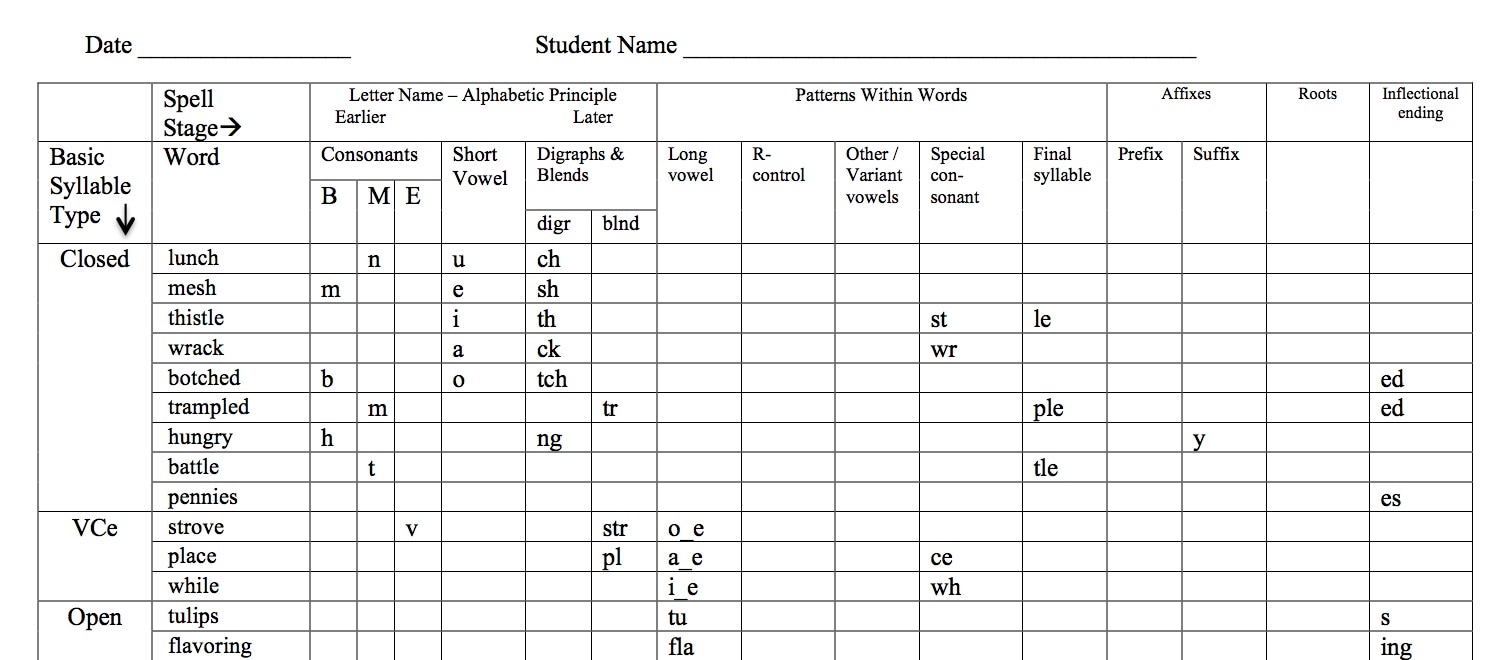
Here in the mountains of western Pennsylvania spring is busting out all over, with dogwoods and honeysuckle blooming, peepers peeping in the wetlands, and returning hummingbirds busily buzzing about as they search for nectar to sip. Spring also signals the fast approaching end of the school year. So I encourage teachers reading this post to give one last spelling inventory before field trips and assemblies take over and you finally wave goodbye (happily, sadly, and/or thankfully) to the last kid as he skips out your classroom door. I first wrote about spelling inventories back in September of 2015. Then I asked teachers to consider giving them to gather information that would help start the year. Now, I ask that you consider them as a bookend assessment that can help provide closure to your year, as well as kick start the next year for another teacher. Spelling inventories are “big picture” assessments, designed to give teachers information about students’ broad knowledge of orthography, which is the spelling system of our English language. More specifically, they give information on students’ ability to apply the alphabetic principle, remember and use conventional spelling patterns, form words based on tense and spelling conventions, and apply word meaning, all in service to correctly spelling words as they write. Given at the end of the year, a spelling inventory is an easy and efficient way to gain information about what your class generally knows about how words work, as well as what your class has mastered over the course of the year. It also provides specific diagnostic information that can be used to help individual students in specific ways. Finally, it helps you to understand your students’ overall reading and writing achievement. Because she states things succinctly (it took me four tries to correctly spell that word, by the way), I’ll quote Marcia Invernizzi: “…qualitative spelling inventories assess children’s developmental spelling knowledge that in large measure determines the quality of their reading and writing” (Invernizzi, p.17). Thus, spelling inventories go a long way in explaining how and why children read and write as they do. If you pass along the information you gain from giving an inventory, teachers in the next grade up will surely thank you, for the information provides insight into the skills of the students who will roll through their door next year. For example, if you're a second grade teacher who gives an inventory next week, you may find that five students still have not fully mastered the hearing, reproduction, and spelling of the short /a/, /i/, and /e/ sounds. Or if you're a fifth grade teacher, you may find that six students lack control of the ture and sure spellings for the /cher/ and /zhur/ sounds found in words like capture, posture, treasure, and leisure. Once you have this information, pass it along to the third grade and six grade teachers. And take a moment to reflect on the scores and decide if there’s something different you want to do with your instruction and activities next year. There are many inventories out there, including Sylvia Green’s Primary and Elementary Word Analysis (Green, 2016), which functions as both a spelling inventory and a phonics inventory, Richard Gentry’s Monster Test (Gentry, 2007), most appropriate for kindergarten children but also used during the first half of first grade, and complex primary and intermediate elementary inventories from the Words Their Way spelling program (Bear, et al, 2015), among others. Of course, you can simply go to the “File Cabinet” tab of this web site and download one of the inventories I have created! At the bottom of this post you can see pieces of two of them. I created spelling inventories for my upcoming book, Super Spellers: Seven Steps to Transforming Your Spelling Instruction (Stenhouse, fall of 2017). Feel free to download any or all of them. Then assess your students with one. You can even report back to me on how the inventory worked for you. Operators are standing by to take your call! (Okay, not really, but it is fun to say). By the way, when compared to other inventories, my inventories have the added advantage of coming in two distinct forms. Also, the long form inventory words are cross-referenced with the seven syllable types. Finally, my short form inventories are super easy to score, and they come in two forms, one for the whole class and one for the individual. To wrap things up, the reasons for giving any specific spelling inventory are generally the same: determining the encoding skills of students, finding out what word features students have control of, determining the spelling stage of each student, and crafting classroom instruction that meets students at their developmental levels. Regardless of which inventory you start with, you can always move to a more or less complex one that fits your level of knowledge and comfort. I encourage you to find a spelling inventory that you like and understand and then give it to all of your students before the end of the school year. Best of luck with you spelling instruction and your end of the year activities, and keep your eyes on the prize of summer vacation! Citations:
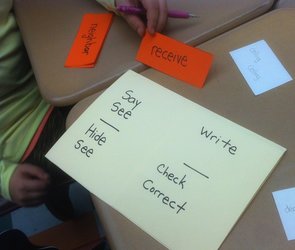
   Like the swallows of Capistrano, National Poetry Month has returned, along with this spring's flowers, showers, and long evening hours. Springtime and poetry go together like daffodils and sunlight. Robert Frost wrote of spring in A Prayer in Springtime (Oh, give us pleasure in the flowers today…), as did William Shakespeare in the poem Spring, (When daisies pied, and violets blue, And lady-smocks all silver-white, and cuckoo-buds of yellow hue do paint the meadows with delight…). Many other top notch poets have waxed poetically of spring, too. I have never written a springtime poem, but then again I am not a “real” poet, merely a clever rhymer with an odd sense of humor and occasional flashes of insight. At the moment, I have little time for even witty word play, but I did want to contribute something for National Poetry Month, and so I dug though my computer files and found a number of kid poems that didn’t make it into my 2010 children’s poetry book, The Delicious Chocolate Donut (And Other Off-Kilter Poems). When I read the poems, I could see why they didn’t make it. Suffering from weak rhymes, clunky rhythms, and subject matter too weird for popular consumption, these poor poems were analogous to the Charlie-in-the-Box and the Spotted Elephant on the Isle of Misfit Toys. Upon second thought, though, a few poems seemed worthy of something more than perpetual banishment in the “unused” folder of my digital filing cabinet. And because spring is a season of rebirth and renewal, I figured, hey, why not uncover a few of them, give them a little light and love and polish, and put them up on the blog? So here they are, giving regular readers of this blog (are there any out there?) a break from my usual spelling posts and providing teachers looking for weird, off-kilter poems with those very things. Feel free to copy and use them in any way you want. You can also download a PDF of the four poems from the file cabinet of this web site. Creatively labeled “Four New Poems,” they’re sitting in the right hand column at the top. A brief word of explanation about the poems is in order. The first was inspired by Sundays dinners cooked by my mother-in-law, Betty Good. For years and years, almost every Sunday, Betty (a home economics teacher) prepared a delicious and extensive old school Sunday dinner (not supper) for her family, consisting of meat (often turkey), potatoes, gravy, two or three vegetables from the garden, rolls, salad, and dessert (typically cake and/or pie and/or ice cream). I have very fond memories of those dinners. This poem is written for two or more voices, which kids love to read and teachers love to have on hand. The second poem for little ones and is meant to be accompanied by lots of motion and activity. The third poem is simply odd, as is the fourth and last poem, which features a fun illustration by Mike Owens, the talented illustrator/animator who illustrated my Delicious Chocolate Donut collection. 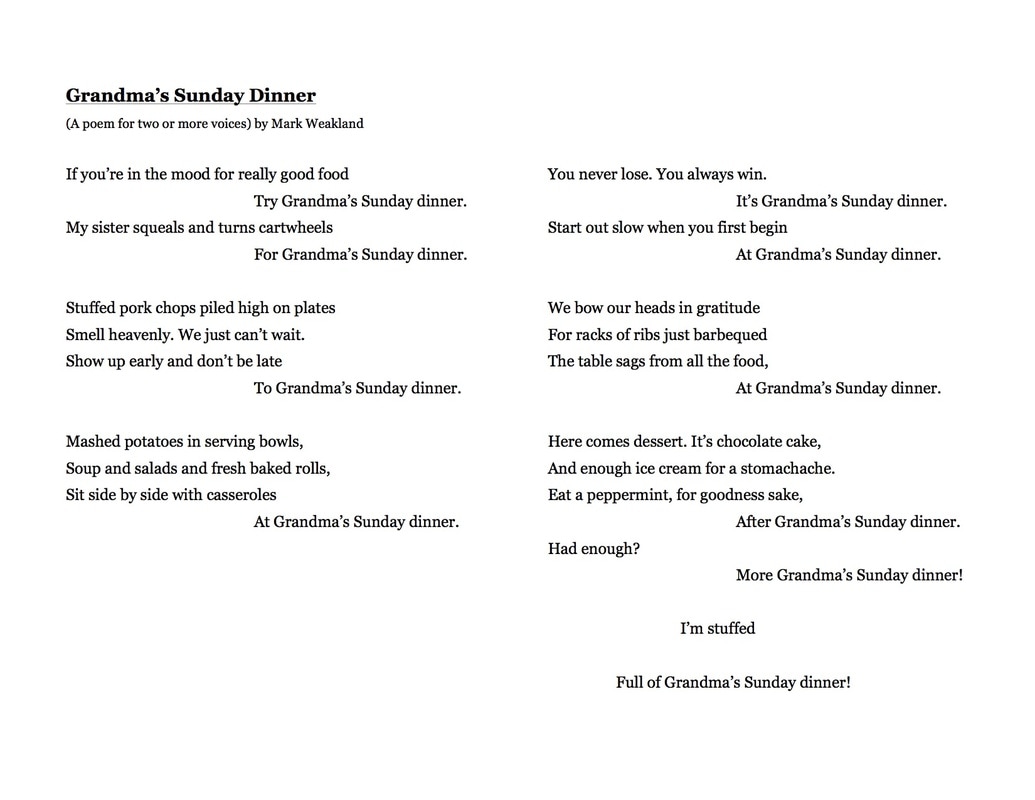 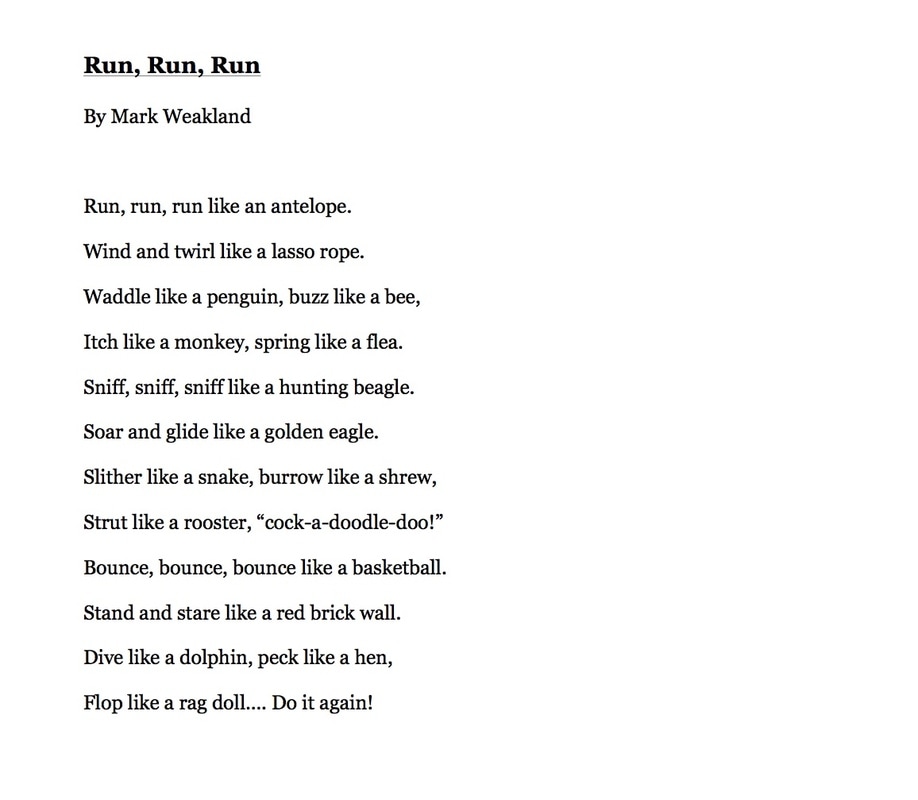 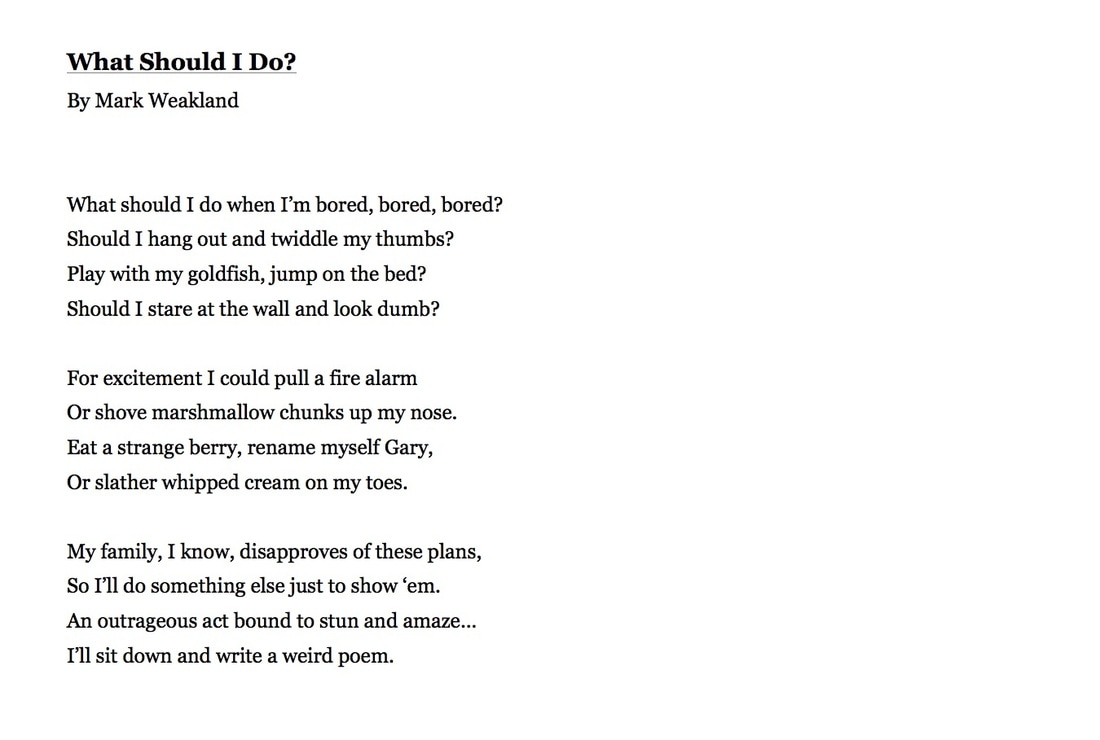 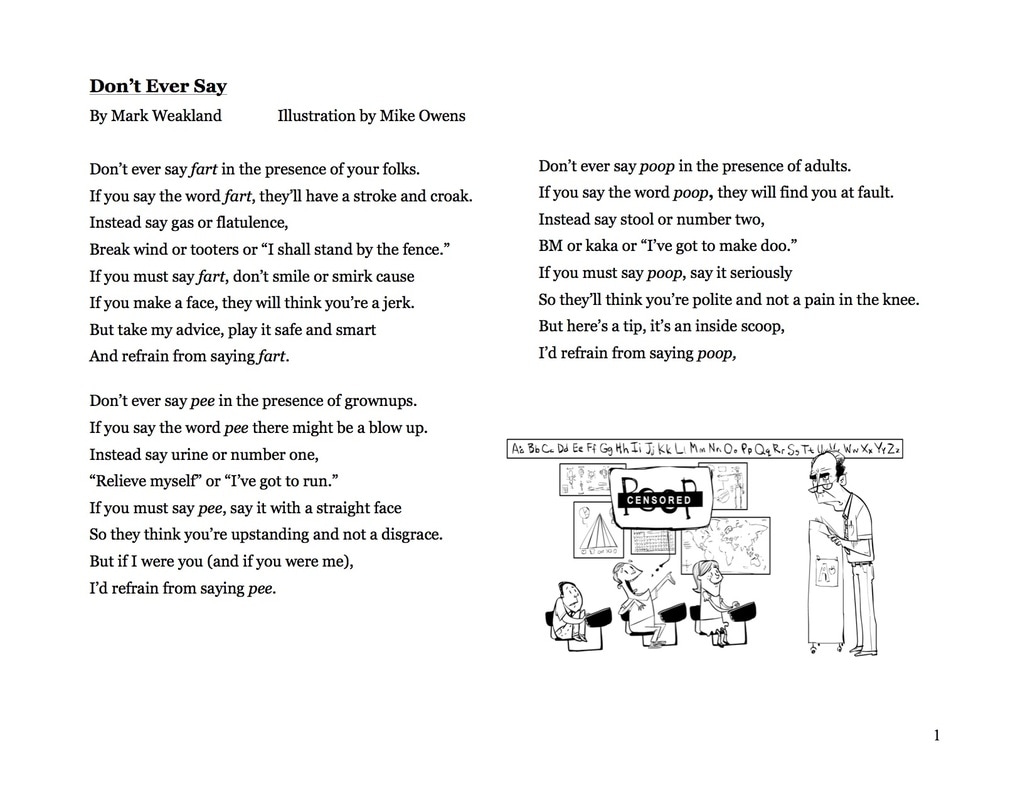 Syllable types provide an easy way to manage the dozens of word features presented in a typical spelling scope and sequence. So let's look at syllable types! Usually, a spelling scope and sequence is organized loosely around the developmental stages of spelling and the word features associated with each stage. For example, the scope and sequences used with 1st graders, who are developing the ability to match letters to the sounds they hear, typically concentrate on CVC patterns, consonant blends, digraphs, and CVe patterns. In contrast, a scope and sequence for third graders, who are developing the ability to notice and use patterns in words, usually contains lessons on frequent and infrequent vowel sounds and spellings, inflectional endings (where plurals and tenses are formed), and special consonant spellings like soft c and soft g, as well as suffixes, prefixes and homophones. As the stages of spelling development progress, more and more spelling features are added. Take a minute to look over the scope and sequence of any spelling program, grades one to five, and you will see dozens of spelling features listed. Because these many features are not organized into a few broad, easy to understand and teach categories, they can present real difficulties for both teachers and students. First, a weakly organized scope makes it harder for teachers to answer these questions: what features have my students mastered, which features need to be retaught, which features do my students have control of when they write, and which features are my students seeing and controlling when they decode as they read? Second, when teachers have an overwhelming number of spelling features to think about, they may lose sight of these big picture reasons for teaching spelling: spelling is for building the brain dictionary, spelling is to enable fluent writing, spelling is for strengthening decoding, and so on. Third, a focus on the minute details (dozens of features) gives teachers and students the false notion that English spellings are unruly, nonsensical, or impossible to predict. Finally, a weekly stream of loosely categorized features makes spelling harder for children to learn and teachers to teach. For example, if you were asked to teach third graders to recall, in any order, the numbers and letters of these two sets - [2, 7, 3, 5, 1, 6, 8, 4] and [B, e, h, T, e, h, C, n, g, e, a] –would it be easiest teach and remember them as unorganized strings of numbers and letters or would you teach them as organized groups: 2468-1357 and Be The Change? Obviously, the latter. It pays to organize, through categorization, large sets of information into smaller subsets. Fortunately for us, a handy method for categorizing spelling exists. It’s called syllable types. Syllable types are an overarching instructional strategy. How so? They categorize all syllables into seven categories, thus reining in the number of spelling features and the breadth of a typical spelling scope and sequence. With only seven types of patterns to think about, your spelling instruction can be more focused and powerful. And when children master the knowledge and use of the syllable types, they have a master plan (a strategy) for decoding during reading and encoding during spelling. 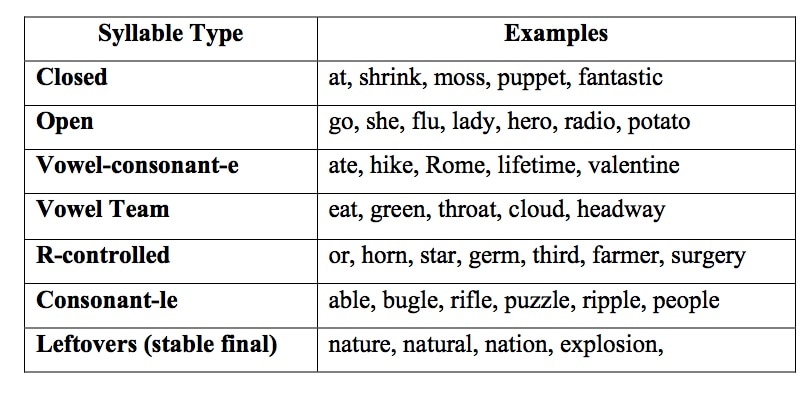 I regularly talk with teachers who gush enthusiastically about using syllable types to teach phonics and spelling in their classrooms. I think we all get so excited about them because syllable types draw attention to all that lies at the heart of spelling: sound, pattern, and meaning. And when students’ attention is drawn to the heart of the matter, they are in a much better position to use strategies, to build a dictionary in their brains, and to become more fluent readers and writers. Teaching spelling via syllable types drives home the encoding-decoding, spelling-reading connection. It allows you to completely align your phonics scope and sequence with your spelling scope and sequence. Equally important, it improves a struggling student’s ability to read and spell multisyllabic words because it is one tool (breaking words into syllables) that provides repeated practice in two areas, spelling (encoding) and reading (decoding). One thing before I move on: Researchers and writers present differing views on spelling nomenclature. For example, some folks call ar, ir, and or patterns “vowel-r syllables,” while others call them “r-controlled syllables.” Likewise, there are differences in opinion about how to classify patterns such as ore (store) and air (stair). Are they r-controlled? Or is one a vowel-consonant-e syllable and the other a vowel team syllable? I mention differences of opinion because I present syllable types as seven in number, while spelling experts such as Louisa Moats and Barbara Wilson present them as six. But in the grand scheme of spelling and reading, these differences are minor. The important point is to organize spelling features into categories of syllable types and then teach them well, over time, in spelling, reading, and writing. Teach what a syllable is If you are going to organize your spelling around syllable types, I suggest you first teach what a syllable is. Begin with the idea that a syllable is a word or a part of a word that has at least one vowel in it. The vowel in every syllable causes your chin to drop when you say the vowel sound. Once your students have basic understanding of what a syllable is (a word or a word part that causes a chin to drop because it has at least one vowel in it), introduce the syllable types. Variations on a theme Of course, nothing is ever easy in teaching. For example, ind and ild are closed syllables, but they are exceptions to the rule because they make a long vowel sound (bind, find, mild, wild). For each syllable type, there are exceptions. Now you may be thinking, “Exceptions in each category? Spelling is so confusing!” While I cannot deny that exceptions add complexity to the simplicity of just seven syllable types, I would maintain that when you tell students “we are going to group all of our spelling patterns into seven basic types,” you have focused a sprawling topic, making it much easier to understand and making it much easier for children to notice commonalities and differences between its many parts. To further illustrate this point, the figure below shows the thirty-seven high-frequency phonograms, often used by 1st grade teachers to teach phonics and spelling, grouped by syllable type. You can see how each falls into one of three syllable types: closed, VCe, and vowel team. 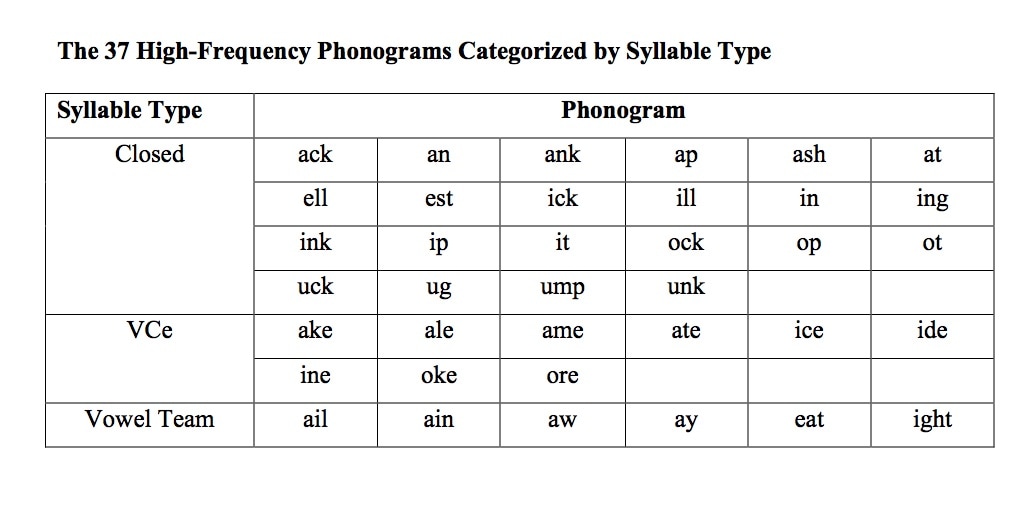 By the way, this sequence of syllable types – closed, VCe, and vowel team – is an appropriate sequence of instruction for students in grade one, keeping in mind that those who do not master the closed syllable type will need to be instructed until they do. Open syllables and r-controlled syllables can be added in the second grade sequence. By the end of third grade, students will be ready to begin to organize spelling words around all seven types. Use syllable types across space and time The seven categories of syllable types can be taught by teachers and used by students between and across grade levels. They give an entire school one organizing principal, thus providing a common language for all teachers of reading, writing, and spelling. At the same time, syllable types provide an organizing framework that all students can use to better understand the workings of spelling features in every spelling stage, from consonants, digraphs, and short vowels in the early alphabetic stage, to long vowel teams and variant vowel teams in the patterns within words stage, to roots, affixes, and inflected endings in the meaning stage. It seems to me that any strategy, routine, or method of organization that crosses classrooms and grade levels holds forth the possibility of greater and longer lasting student learning. Simply put, when students experience and use a strategy, routine, or method year after year from a multitude of teachers, they are much more likely to master that strategy, routine, or method and consistently apply it in variety of settings. If a school were to embrace the teaching of syllable types, by the time students got to fourth grade they would have had three years of exposure to the this organizing principle, surely a strong foundation. Even in the final stage of spelling development, where the focus is meaning rather than pattern, syllable patterns can still be referenced and explored. For example, the figure below shows how multisyllabic words are made up of combinations of syllable types. As syllable types are introduced over time – in a classroom, between classrooms, and between grades – students can explore longer and longer words made from a mixture of short syllable types. This exploration of and exposure to multisyllabic words increases their ability to successfully read and write hundreds, if not thousands of words. 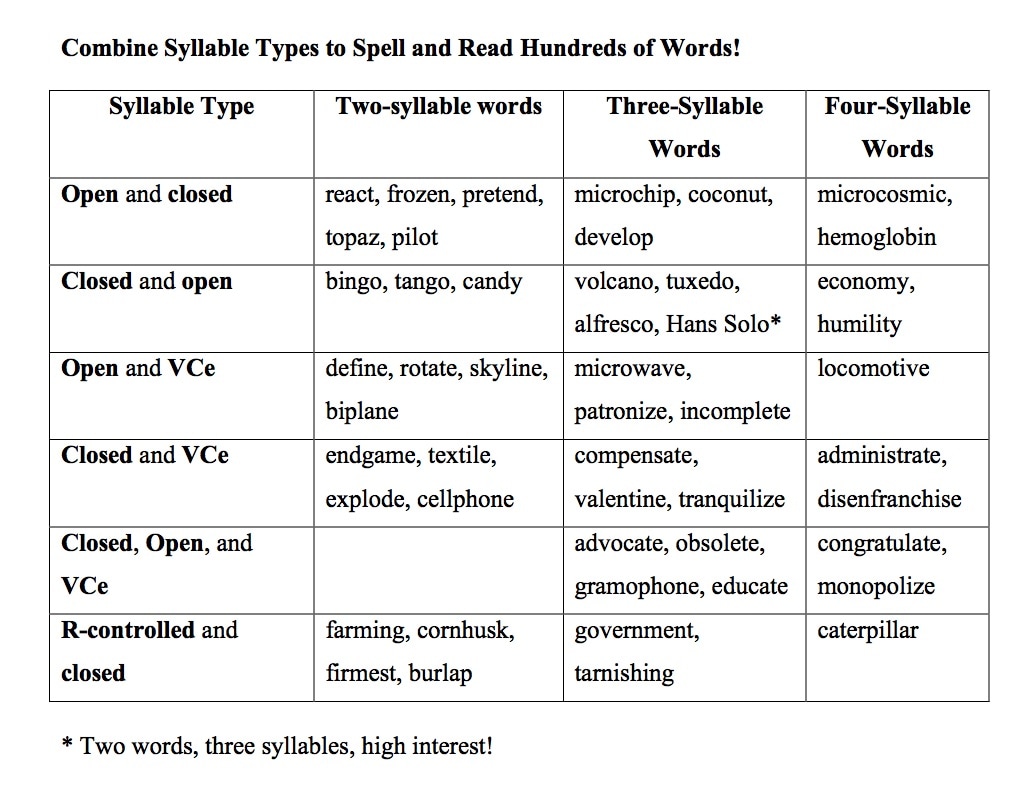 My August and September 2016 blogs were devoted to the idea of teaching children strategies for spelling unknown words. Specifically I discussed spelling by analogy (using a word that you know as template for spelling a word you don’t know) and spelling by sound (hear the sounds, assign letters and patterns that make those sounds). Today's offering is See the Word Inside Your Head, the strategy accomplished spellers use most often. Some children develop the ability to “see a word inside their head” naturally. Others do not. To encourage students to build and use a repository of stored words in their brains, teach them to study spelling words using the steps given below. Then, when it comes time to spell words independently during writing (or on a test), remind students to use these steps: see the word in your mind, write the word, and check the word. As teachers, we hope that by intentionally using “see-write-check,” students will later generalize the strategy into the automatic ability to visualize a word, write it down, and then check it against the word stored in their brain dictionary. I have seen variations of the “see the word” strategy in core-reading programs for a couple of decades now. My most recent encounter with it was while perusing the stand-along spelling program Spelling Connections, published by Zaner-Bloser. Spelling Connections presents a three-step strategy for studying spelling words. Here is my two-step variation. 1. Say-See, Hide-See
Here is an example of how I might model my use of this strategy and use a think aloud to explain its workings:
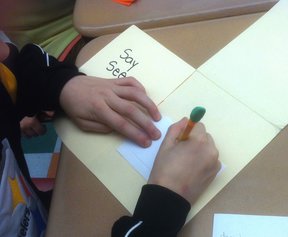
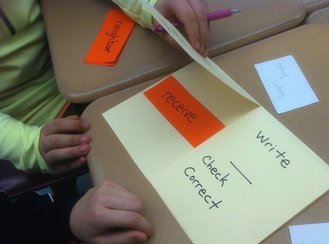
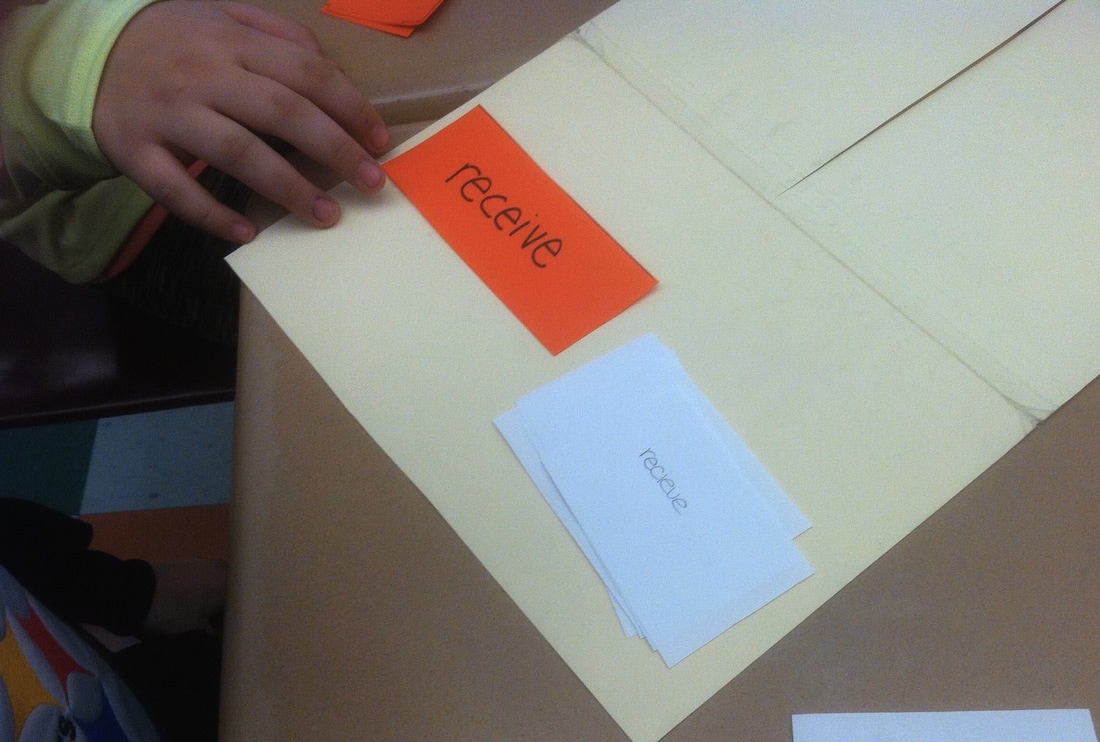
An easily constructed “flip folder” provides opportunities for students to practice the strategy “see the word in your head.” The activity, which can be done independently or with a buddy, is designed for instant error correction. A student spells a word and then checks it for correctness. If the word is misspelled, the student corrects it before moving on to the next word. To make a flip folder, you need a manila folder, a marker, a set of word cards, and stack of blank slips of paper. The activity’s routine mirrors the two-step word study strategy outlined above. Here is a brief description of the routine, which is also presented in the pictures below.
Word ladders (also known as word-links, laddergrams, and doublets) involve morphing one word into another by changing one letter, or set of letters, at a time. Each change creates a new word, and each new word is a rung on the ladder. Starting with the word at the bottom of the ladder, it may take a speller five, six, or seven or more words to reach the target at the top. In this way, a HEN is changed into a FOX: hen, pen, pin, fin, fix, fox! I first heard of word ladders, and began using them, while teaching in 3rd grade classrooms. Later I learned Tim Rasinski made them popular with his Daily Word Ladders books for teachers (Rasinski, 2012; 2008). But while researching my upcoming Stenhouse book, Super Spellers, I discovered Lewis Carroll was the one who invented them! Carroll, best known as the author of Alice in Wonderland, was also an eminent mathematician and a renowned puzzle creator. In 1877 he created a word puzzle that he dubbed the doublet, a name likely inspired by the witches’ incantation in MacBeth: “Double, double, toil and trouble.” Vanity Fair published Carroll’s doublets in 1879 and they quickly became all the rage. Below are five of his doublets (can you solve them?). Also shown is a word ladder that is actually climbable! While visiting a botanical garden in New Zealand, my wife, Beth, and I climbed these etched granite steps, took a picture from the top, and wrote down the solution to the doublet BODY and SOUL in our scrapbook. 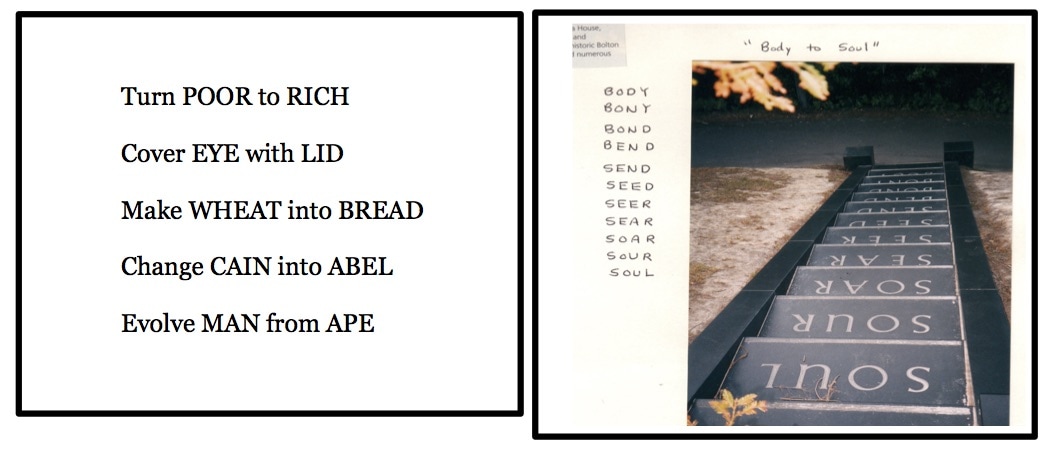 Word ladders help children notice sounds, especially inner vowels. To change one word into another, students must listen to sounds and decide on letters. Unlike Carroll, who gave puzzlers no clues regarding the ladder rungs, you can explicitly tell your students what each word on a rung is. Over time, as young children and struggling readers write each word in the ladder, they notice patterns within words and between words. If desired, you can also discuss the meaning of the words that make up a ladder. In this way, SPELLING becomes VOCABULARY! There are plenty of word ladder activities available for purchase from Tim Rasinski and others. Below you can see one of Carroll’s classic doublets (with its solution), plus one I dreamed up: turn a CHORE into something you LIKE. But you can create these word sequences yourself. While I like to create ladders in the spirit of Carroll’s doublets, the words on either end don’t have to be tied together by a common theme. Also, once students become accomplished at completing word ladders, you can put them to work making their own. It’s a real accomplishment when a child authors a word ladder that becomes part of a literacy center. 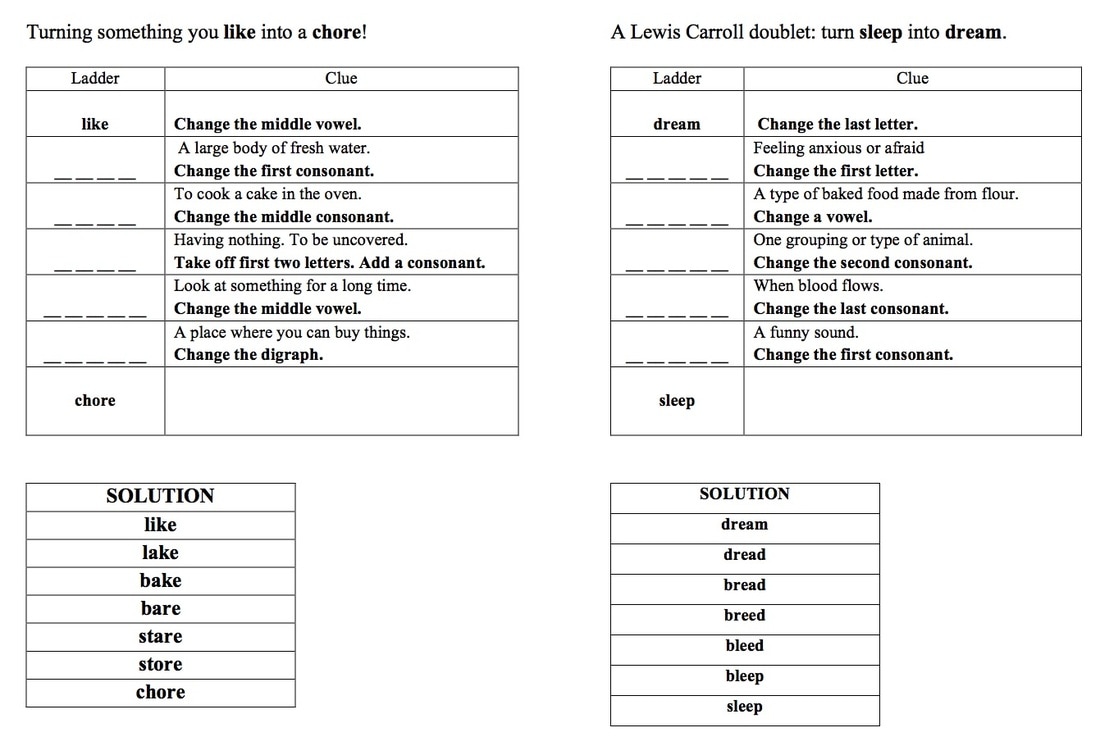 I have used word ladder activities with large groups of kids, but I also have guided children through them in small groups during guided reading time, where I used a word ladder as a word study activity. Once children can competently recreate the routine on their own, they can complete word ladders with a buddy during independent work time.
I suggest you have students write their word ladder sequences on paper. A whiteboard or iPad will work but the written words need to be relatively small. Paper is probably best if your ladder is longer than five or six words. Students should never erase the previous word. The point is to create a sequence that students can look through to see the relationships between the words. Let’s say you created a word ladder that changes hen into fox through the sequence I outlined in the first paragraph. To teach this word ladder, start with the word hen. Say the word and have the kids repeat it back to you. You may even want to have the students stretch that word and zap it so they can hear the sounds in the word. I think highlighting inner vowel sounds is especially important because I’ve found that these are the sounds hardest for students to hear, reproduce, and associate with correct letter combinations. After students have written their starting word, you write the word and have your students check their spelling against yours. Next, follow this little routine:
Here is an example of what a teacher might say during a word ladder designed to focus on pattern and meaning, rather than just individual sounds and letters. The words come from one of my ladders: make a CHICK CHEEP (the solution is chick, chin, chip, lip, leap, cheap, cheep). After a teacher briefly reviews the ee and ea vowel teams, and after she leads the class through the first four words (chick, chin, chip, lip), her instruction might sound like the following:
Once you start moving into this type of word ladder, Patricia Cunningham’s Making Words books become a wonderful resource. There are probably a dozen or more of these books on the market, and they address many grade levels. While not exactly word ladders, each lesson follows the basic process of swapping sounds and letters in and out of words to make new words. Each Making Words lesson draws on the letters of a relatively long target word, such as oatmeal, to create sets of smaller words that follow patterns, such as eat, meat, team, meal, ate, mate, late, and so on. Word ladders and making word activities are not only opportunities for children to hear sounds, assign letters, notice patterns, and think about meaning. They are also opportunities for you to conduct formative assessment. As you walk among the working students, notice who is confused about patterns or sounds and who is not. Explore their thinking process by saying, “Tell me why you put this letter here” and asking, “What pattern are you thinking about right now?” Carry a clipboard and piece of paper with you and you can take note of the children who require re-teaching, as well as list the areas in which they need additional instruction
Slow is not a bad thing, nor is focused. Sure, slowpoke is an unflattering description, and focused can be synonymous with single-minded. But when we look at slow and focused through the lens of instruction, we understand that slowing down and focusing provide us with a chance to thoroughly teach material and give our students opportunities to master critical skills. Adopting a slower pace and a more targeted curriculum allows for richness and depth in lessons. And a slow and focused mindset gives both teacher and students the opportunity to enjoy the learning process. When it comes to making changes in spelling instruction, a fine place to start is tightening your spelling sequence. Some spelling sequences are simply too long, with too many weekly lessons. The longer the sequence of lessons (25 weeks, 27 weeks, 30 weeks), the more you are forced move quickly to cover all the material. My suggestion is to modify your sequence by strategically condensing its number of weeks or steps. Having fewer lessons gives you time to reteach concepts and patterns when children haven’t mastered them in the first cycle of instruction. When you have space in your sequence to accommodate re-teaching, you won’t need to push kids into a new concept when they have yet to master the previous one. The chart at the end of this post shows a sequence with fewer lessons. I reduced the number of weekly lessons by doubling up on vowel-consonant-e lessons (which allows me to teach how vowel sounds compare and contrast), taking out a lesson that is thoroughly covered in third grade (oi/oy), deleting the schwa lesson, combining ch, tch, and ph into one lesson, and throwing out a lesson that teaches an infrequent spelling pattern (ar, e.g. parable). After you’ve tightened the sequence, narrow the scope. Look over the spelling concepts introduced each week and consider reducing how many you teach in each lesson. If you see a lesson that teaches five or six spelling patterns, identify the low-frequency spelling patterns and take them out. I believe in pruning low-frequency spelling patterns for two crucial reasons. First, there is much to teach and little time to teach it. Why spend valuable time teaching patterns that students don’t often encounter? Many vowel patterns occur infrequently. In fact, the ie spelling of the long i vowel sound and the oar spelling of /or/ occur in fewer than 2% of words with those sounds! So why teach the oar spelling when a second grader might encounter it in oar and board and that’s about it? And why teach the ie pattern when pie is the only word a second grader might write? Teach the correct spelling of these words if and when you need to, not as part of your regular spelling instruction. Second, presenting fewer unknowns in any given lesson is best instructional practice. Teachers often analyze a complex task in order to fully understand it and effectively present it. Once the discrete steps are understood, the task can be taught using the law of one unknown: present one unknown piece of learning, have students practice it, assess students for its mastery, and once it is mastered, move on. But when it comes to spelling, teachers often teach four, five, six, or more spelling patterns or concepts per week. While we probably can’t afford to teach only one unknown pattern,we also shouldn’t allow ourselves to be pushed into presenting more than two to younger children and three or four to older ones. If we present too many patterns or concepts at once, students fail to learn, become frustrated, and may give up. Lessening the cognitive load by presenting fewer spelling concepts in each lesson allows us to build success for students, thereby strengthening the cycle of success, motivation, and learning. In the chart below you can see how I took a 27-step second grade sequence, reduced the number of steps to 21, and then reduced the number of spelling patterns presented in eight of those remaining steps. With a scope and sequence like this, you can move from “memorize-and-move-on” instruction to transformed instruction that produces more enjoyable lessons, gives kids a real shot at spelling mastery, and bolsters the reading and writing skills of struggling learners.  If you’ve been following my spelling posts, you’ll know that for the last year I’ve been encouraging teachers to teach students how to spell, not what to spell. Teaching how to spell means moving away from a one-size-fits-all program and towards a philosophy of differentiation. It means showing kids how to think about words by teaching lessons focused on sound, pattern, and meaning. It means teaching students strategies that they can use to spell unknown words. And it means teaching broadly applicable principles of spelling, rather than dozens of narrowly applicable spelling rules. Simply said, spelling rules do little to help children understand how words work. When they have numerous variations and exceptions, they can’t be applied to unknown words. Finally, traditional spelling rules can lead to confusion and spelling errors. Consider these two popular rules: “I before E except after C,” and “When two vowels go walking, the first one does the talking.” “I before E except after C” only applies to words in which the ie combination functions as a vowel digraph that clearly makes a long E sound. For example, the following words can be spelled using I before E: piece, niece, chief, thief, yield, and field. Meanwhile, the words deceit, ceiling, and receive provide the exception to the first half of the rule. But in dozens of other words, the rule fails more than it succeeds! For example, I before E does not work in words such as weigh, sleigh, eight, freight, beige, and vein, or in words such as foreign, forfeit, heifer, and height. Nor does it apply to words in which an adjacent I and E (or E and I) aren’t a digraph, such as in deity and science and their various derivations (deify, deification, prescience, scientific, and so on). Finally, even when a vowel digraph makes the long E sound, there are exceptions to “I before E” Here I am thinking of seize, weird, either, neither, protein, and caffeine, among others. In the end, because “I before E” has so many exceptions, it is rendered mostly useless as a rule. If you want to teach children how to determine if they should have the E first or the I, I’d suggest you start with a broadly applicable principle: certain vowel team patterns are almost always pronounced the same way. This means you should teach the eigh pattern because it almost always says Long A (sleigh, weigh, eight, weight, neigh, neighbor), you should teach the ief pattern because it almost always says EEF (thief, grief, brief, debrief, belief, disbelief), and you should teach the ield pattern because it almost always says EELD (field, yield, wield, shield, Garfield, windshield). Teach your students these patterns and then give them many opportunities to spell, write, and read these patterns in many different settings. The more they spell, read, and write words with patterns, the more they will enter these words into the dictionaries in their brains. 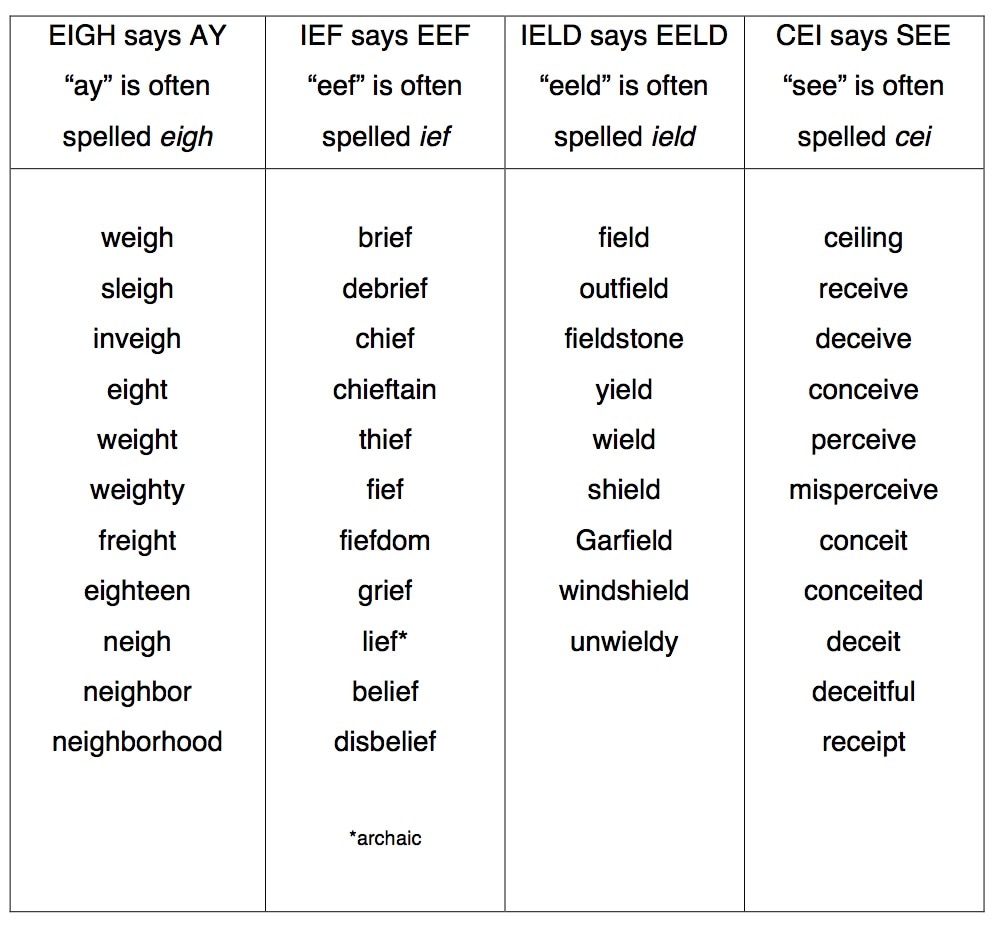 Now let’s consider “when two vowels go walking, the first one does the talking.” Like “I before E except after C,” the “two vowels go walking” rule does little to nothing to help students develop an understanding of spelling patterns within words. How does it teach kids to read or spell the following words, all of which have “two vowels walking:” vein, great, height, their, spread, spoil, pear, noun, piece, heard, rough, and moon? Why not teach this much more useful principle: a sound’s position often determines its spelling. Often, there are many spellings for one vowel sound. Thus, vowel spellings can seem horribly complicated. But when you teach students to be guided by sound position, vowel spellings become more predictable. For example, the /ou/ sound can be spelled ou or ow. Before students have committed whole words like cloud, clown, outer, and flower to the dictionaries in their brains, they need a way to decide how to spell the /ou/ sound. Is it clowd or cloud? We can help kids figure out which spelling to use by teaching them to think about where they hear the sound in a word. In this instance, you might tell your students that if the /ou/ sound is heard at the beginning of a syllable, spell it ou. Then give them examples (ouch, out, oust, and ounce). If /ou/ is heard at the end of a syllable, spell it ow (as in cow, now, chow, eyebrow, powder, and flower). And if /ou/ is in the middle of a syllable, use ou (as in mouse, loud, bounce, joust, and grouch). Finally, teach them an exception to the middle position: if you hear /ou/ in the middle of a one-syllable word and the vowel sound is followed by a /n/ or /l/ sound, then spell it ow (as in brown, gown, howl, and growl). Other vowel spellings that can be determined by sound position include oi and oy, ai and ay, and long vowel sounds at the end of a syllabe in multi-syllable words (most are open syllables, which are simply spelled with one vowel, as in hero, ego, fever, ivy, vital, pilot, navy, favor, bacon, radio, and potato). Using the position of a sound in a word also works for consonant spellings. Thus, when you hear the /f/, /l/, or /s/ sound after a short vowel sound in a one-syllable word, you double the f, l, or s letter (as in fluff, bill, and glass). The main point: a few principles are easier to remember and more broadly applicable than many exception-ridden rules. 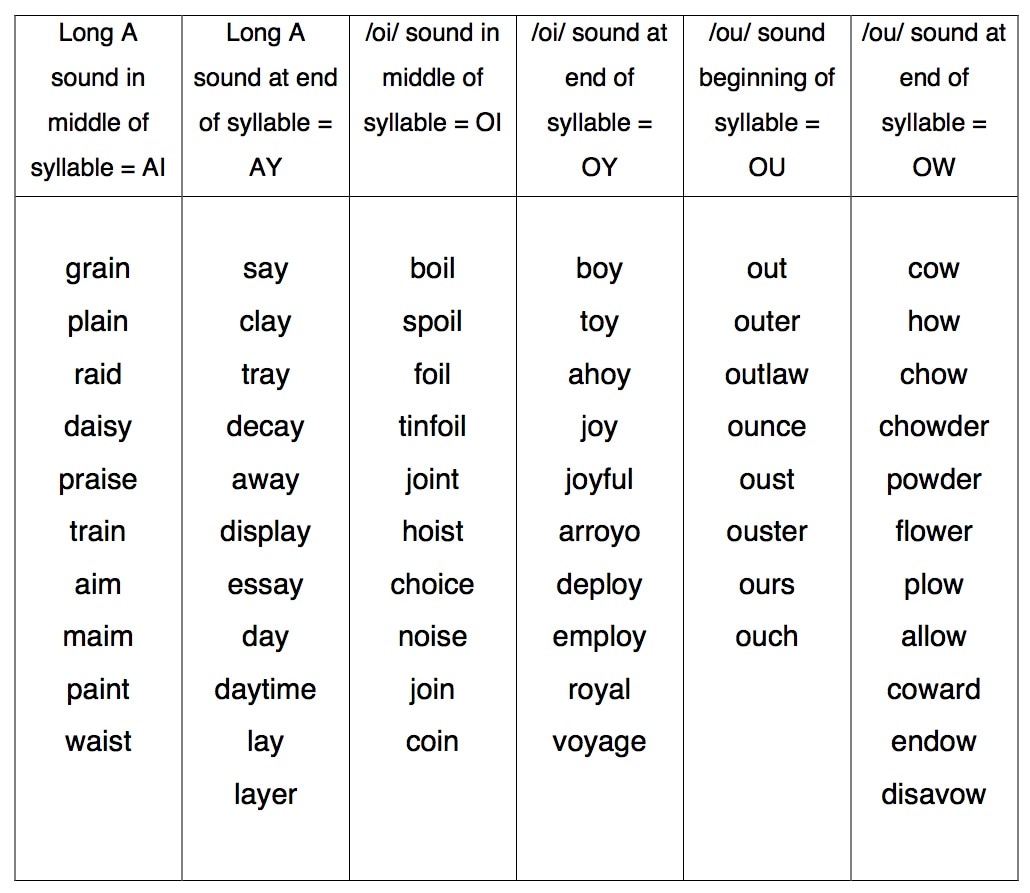 Like the Look-Touch-Say activity I discussed in September, Word Dictation and Sentence Dictation are activities that give students opportunities to listen to known and unknown words, apply strategies to spell them, analyze mistakes, and notice the sounds, patterns, and meanings of words. These activities can be done whole group, small group, or with a buddy, and the means of writing the words can vary: old school paper and pencil, individual white boards, or digital tablets. 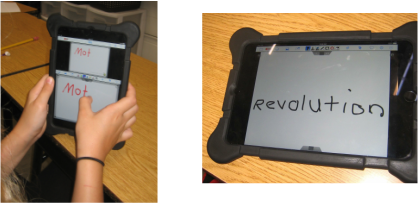 Word Dictation Finding words for dictation is easy if you create a master spelling list that includes many words that follow a few sounds, patterns, or meaning parts. Keep the dictation session brief, maybe six or seven minutes long, and allow a little time for discussion during the instant error correction phase. Here’s an example of what this activity looks and sounds like when I teach it to students who have white boards for writing.
When dictating unknown words, I use a little chant to reinforce the idea that words follow patterns and a strategy for spelling is to use a known word to spell an unknown word (spelling by analogy). The chant is simply, “If you can spell ___, you can spell ___.” Thus, when I ask children to spell the word bruise, I might say, “The next word is bruise. If you can spell cruise, you can bruise.” Likewise, “The next spelling word is bruising. If you can spell cruising, you can spell bruising.” Sentence Dictation In sentence dictation, students write a sentence that’s completely decodable based on what they’ve previously learned in spelling. I began using this activity in heterogeneously grouped classrooms after I had done it for a year with my Wilson Reading intervention groups. I think it’s an effective activity for two reasons. First, it gives kids the opportunity to apply spelling strategies across a string of words. Second, it asks children to listen closely to entire sentences and then remember what was said. I think you’ll agree that listening and remembering is a skill many children (and adults, too) need to practice! In April and May of last year, I taught spelling for three weeks in a second grade classroom. One of the weeks focused on two long vowel sounds: long I spelled i_e and long U spelled u_e. To help the students understand how adding a letter e to a CVC word can create a long vowel sound, I took the class through a sentence dictation activity. The words in each sentence came from my spelling master list, not from their take-home list. Because the students had never heard the words before, they had to apply sound and pattern knowledge to spell them, which is the point of using “unstudied” words. I started the sentence dictation by saying, “I say a sentence, we say the sentence together, you say the sentence, and then you write the sentence. I say, we say, you say, you write! Get ready, here’s the sentence: I spin the slim flute. Say it with me: I spin the slim flute. Now you say it.” Every student said the sentence – I could see every mouth moving – but I still wasn’t sure they were all saying the right words. So I repeated the sentence more time and had them repeat it. Next, after saying, “You write it,” I walked through the class and monitored their progress. As students wrote, I noticed some of them pausing to repeat the sentence under their breaths. I also noticed that almost all of the children were spelling the words correctly. Good for them! 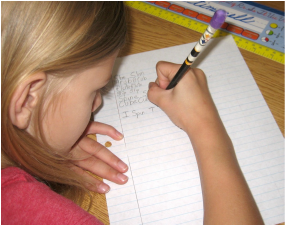 Sentence dictation can take many forms. It can be a regular part of your spelling instruction or it can be done once or twice a month. You can have children write with paper and pencil, with white board and marker, or with computer tables and a writing program. You can incorporate the activity into your weekly spelling test. I used to do it as an opportunity to earn a bonus point. Any student who spelled the entire dictated sentence correctly and included correct capitalization and punctuation received a bonus point, which offset any misspelled test word.
If you feel the need to find sentences, programs such Recipe for Reading, Wilson Language, and Step By Step Learning, have them. Sentences can be made more memorable if they are goofy, and Step By Step Learning has word cards called Silly Sentence Cards. But I think you can make your own sentences. To create a sentence or two doesn’t take much time, and with a little extra effort you can create ones that are amusing to elementary-age kids. Here are sentences using long U words from the master list I created in my upcoming spelling book for Stenhouse Publishing: June was rude when she threw a cashew. When he sat on a juice box, my nephew bruised his butt. But why shoulder the burden of writing sentences? Put the work on the shoulders of the kids! Challenge your students to craft silly sentences from their list of spelling words and submit them to you. Then look them over, reject any with incorrect mechanics, put the rest in a pile, and randomly draw two. Read these to the class during sentence dictation or for a spelling test bonus point. The children who are picked will be thrilled. 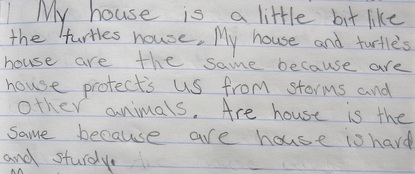 An amazing amount of work teaching in schools near and far, bikes ride in the fabulous fall weather in times between the work, and a recent bout of bronchitis - all of this has kept me from my blog. But today I’m back, breaking the dry spell with an entry on spelling strategies.
In a September post, I discussed the sound-based spelling strategies of Stretch, Zap, and Chin Drop. I followed that with a post on an activity that gives children opportunities to practice these sound-based strategies. Today’s post has to do with meaning, the third layer of orthography (sounds and patterns being the other two), which begins to develop a little later in a child’s life, typically around the age of 6 or 7. Just as words have sound parts (phonemes) and letter parts (graphemes), words also have meaning parts (morphemes). Teach morphemes to students and they can use meaning to spell words. One-syllable words are often morphemes unto themselves. Think of words that rhyme or sound similar, words such as two and too and our and are. While they sound similar, their meanings are dramatically different. Even at a young age, students can be taught to pay attention to the meaning of these words. But the initial teaching must be direct and explicit, and for some children the opportunities for practice must be many. Below we see a third grader who is confused about the usage of the words are and our. The third grade teacher, who happens to be me, never gave his class enough opportunities to practice the use of both words, so I’m not surprised that this third grade writer didn't use the word correctly in this independently written piece. As an instructional guru once said, “If they didn’t learn it, you didn’t teach it!” By the way, formative assessment through independent writing samples (such as this one), provide opportunities to change instruction In the upper grades of 4th, 5th, and 6th, affixes and Latin roots take center stage in spelling, and it’s at this time that teaching children to pay attention to meaning really begins to pay off. Most upper grade elementary school teachers I know spend a good deal of time teaching students prefix and suffix meanings, such as un (not), uni (one), less (without), and so on. The more time you spend on the spellings and meanings of affixes, as well as the spelling and meanings of roots, the more your students will understand the meaning of the text they are reading. Exploring Latin (and Greek) base words and root words helps students understand that word spellings hold word meanings. In the upper grades, spelling instruction shares much with vocabulary instruction because so much of it is meaning based. By examining the spellings of seemingly unrelated words, children can begin to see how and why they are actually related to one another. For example, astro and aster have their roots in astron, the Greek word for star. Knowing the morpheme aster helps readers understand the meaning of astronomy, astronomer, aster (the flower) and asterisk. But what about disaster? Disaster, a word that literally means bad star, is rooted in the ancient belief that comets (once thought to be stars) were harbingers of bad news. When a comet appeared, war, pestilence, or some other calamity was sure to follow. Here’s an interesting connection between common words based on the root quar. We all know a quart is a fourth of a gallon, a quarter is a fourth of a dollar, and a quartet has four members. But what’s quarantine’s connection to four? Turns out that quarantine comes from quarante or quarania, the French and Italian words for 40. In the days of sailing ships, if a vessel arriving in port was suspected of harboring an infectious disease, the ship and its sailors had to avoid contact with others by staying moored off shore for about 40 days. Paying attention to meaning can be especially helpful to spellers because the sound (but not the spelling) of a morpheme can change between words. If students understand that know is spelled k-n-o-w, and if they realize that the word knowledge has a meaning related to know, then they can use that information to correctly spell the word knowledge, even when the words initial vowel sound is different from the vowel sound of know. The same holds true for word derivations such as pray and prayer, define and definite, wild and wilderness, and relate and relative. I use the “think about meaning” strategy fairly frequently. For example, because I have a hard time seeing the word competition in my mind, sometimes I’ll spell it compitition. But as soon as I write it, I can see that this word doesn’t look right. If I can remember to start my spelling process by thinking of the word compete, which is easy for me to see and spell, then I spell competition correctly right from the start. The spellings of roots and bases often remain stable across word derivations, even as the sound of the roots change. Using meaning to spell is also like spelling by analogy. In effect, students can use a word they know to help them spell a word they don’t know. As before, teach your students a little routine for spelling an unknown word by meaning and analogy: 1. Say the long word you want to spell out loud. Think about what it means. 2. Ask yourself, “Is there a shorter word that is related to the meaning of this word? Do I know of a short word that would help me spell this longer word?” 3. Write down the short word you know. Use it to spell the longer word. Check the word after you spell it: Is most or all of the spelling of the short word contained in the longer word? Does your longer word look like it’s spelled correctly? 4. Check the word after you spell it: Is most or all of the spelling of the short word contained in the longer word? Does your longer word look like it’s spelled correctly? 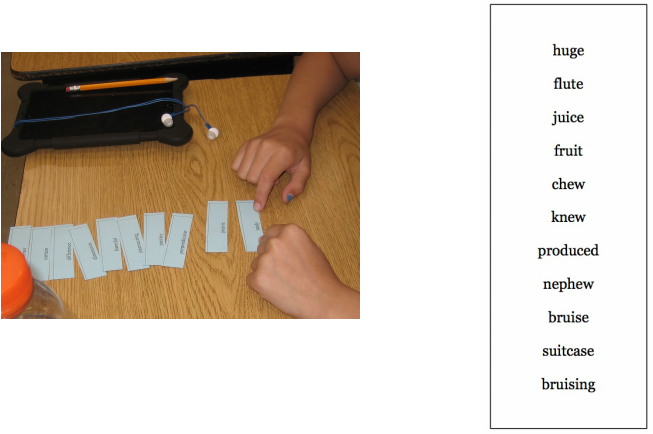 A quick and engaging activity, Look Touch Say is a nifty way to practice syllable types, spelling patterns, word definitions, Latin roots, and much more. Because it constantly cycles back to the basics of what you want to teach, it promotes mastery learning. And because it’s a short routine, taking only two to three minutes, it makes for a good warm up prior to word building or word dictation activities. I’ve modified and adapted it over time so I can use it in a variety of situations. Once you become familiar with it, I think you’ll find yourself doing the same.
First, let’s look at using Look Touch Say as a way for younger children to practice common spelling patterns, and let’s discuss manipulatives rather than a word list as the material for teaching. To start the activity, decide on the patterns you want to teach and/or review. Patterns can be considered as chunks (ate, ain, eep, etc.,), vowel teams (ee, ai, oi, igh), syllable types ( r-controlled, open, closed), inflectional endings (ing, er, ed), and so on. Plastic tiles, magnetic tiles, foam blocks – anything will do. The materials I used with kindergarteners and third graders came from companies such as Step By Step Learning, Touchphonics, and Wilson Language, but you can, of course, make your own materials. Let’s imagine it is November and you are teaching first grade. Let’s also imagine you have been using the 37 Most Common Phonograms chart (mentioned in my last blog) as your scope and sequence. Last week’s lesson focused on short o patterns: ock, op, ot. This week your focus is short U patterns: ug, ump, unk. To reinforce the spelling of the patterns, as well as to have students notice the differences in the sound and spelling of the patterns, you decide to do five minutes of Look Touch Say. Here is a routine and a script for the activity: Have the students place the patterns in a row on their desks. Pick a pattern, such as ump, and say, “Look for ump.” Follow that command with “Touch it.” At this point, the students should only be scanning for the word part and then touching it with their index finger. Monitor their touches and guide and correct anyone who has made an error. After two to five seconds, depending on the age and ability of your students, the number of manipulatives on their desks, and how much monitoring and correcting you are doing, give the command, “Say it!” At this point, the students should say the word part. After praising their attentiveness, go to the next pattern. The routine is merely a repeated cycle of commands, which sounds like this:
The Look For and Touch It commands give children think time. As you scan the room, wait until every child as found the word. Only then say, “Say it!” You can also mix in the command “Spell it”:
Another variation is Look, Touch, See, Say, Spell. In this variation, you incorporate the all-important strategy of seeing the word (or in this case the pattern) in your head. But be careful: this sequence might be too much for young students.
You can also work in commands that are more open ended. For example, you might say, “Look for a pattern with the /ŭ/ sound.” In this case, when you give the “Say it” command, some students might say unk, some might say ug, and some might say ump. This variation is not for teachers who like orderly and uniform responses! But it you’re okay with a bit of chaos, try it out. Now let’s consider doing Look Touch Say with older students, and this time using a word list or word cards. Pull a subset of words from your master list, print the subset as a list, and give the list to the large group or small group of students you are working with. It might look like the list below. Or you can have the kids put the words onto cards that can later be used for pattern sorts. First, review the words by simply saying, “Look for fruit.” Quickly follow that with “Touch it” and after a pause, “Say it.” Next might be “Look for nephew.” “Touch it.” [Pause] “Say it.” This type of direct and explicit review, cycled over and over again, can be especially helpful to ESL students or students in special education, who need practice and repetition in seeing and saying words. Next, move to noticing patterns. For example, you might say, “Look for a word with the ing pattern.” “Touch it.” “Say it!” Here all the children would say, “bruising.” But if you were to say, “Look for a word with the vowel-consonant-e pattern,” then different children would touch and say different words. You might follow up their response with “Very good! I heard some say huge, some say flute, and others say suitcase. Those are all correct. Each has the vowel-consonant-e pattern.” Add a bit more by saying and asking the following: “Look at huge and flute. How are they alike? What long vowel sound is produced in those words? How is it spelled? Look at suitcase. Is that word similar to huge and flute in any way? How is it different? How many long vowel sounds are in that word? How are those sounds spelled?” You can also think in terms of syllable types rather than patterns. For example, you might say, “I’m thinking of a word with an open syllable. Look.” After the students look over their spelling list, say, “Touch.” Students then touch a word with appropriate syllable, in this case produce (the open syllable is pro). Or you might say, “Look for a word with a vowel-consonant-e syllable,” which leads to students pointing to and saying either suitcase or, more subtly, produced. Finally, bring meaning into this routine. Start simply, with a simple word definition routine such as “Look for the word that means discolored skin that comes from an injury” (bruise) or “Look for a word that means the son of one’s brother or sister” (nephew). Next, move to something more conceptual in nature, such as inflectional endings. A command for an inflectional ending might be “Look for a word that happened in the past.” “Touch it.” [Pause] “Say it.” Here the students would respond, “Produced.” This might be followed with a quick review of the inflectional ending, its meaning, and the principle for spelling it., which might sound like, “What spelling ending tells us an action happened in the past?” After the children respond with “ed,” you might say, “And what is our rule for adding an ending, like ed, to a word that already ends with e?” I have found that students learn the Look Touch Say routine quickly. Soon they will be ready to mimic it back to you. When this is the case, ask for a volunteer to lead others using a word he or she has picked. Still later, buddy children up and have them practice in pairs, or put the routine on your “I Can…” list and allow children to work with each other during your small group / guided reading time. Good luck and have fun! |
Mark WeaklandI am a teacher, literacy consultant, author, musician, nature lover, and life long learner.
|
 RSS Feed